Introduction
The main paradigm used to speed up license management is the use of "search". On every page in the Zentitle UI you can quickly search for a license code by dropping it into the search bar and then you easily edit or review the entitlements for that license, all within seconds.
Getting started
Login to my.nalpeiron.com
Search and edit your licenses
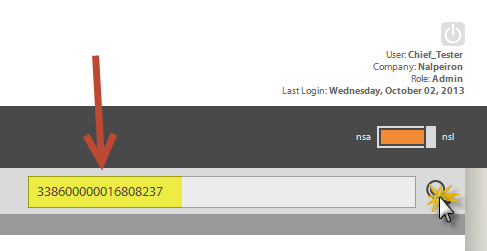
- Paste into the bar a code from your database or a client and click the "search" icon on the right (Magnifying glass).
The resultant search should find your code if its in your "bank" of codes.
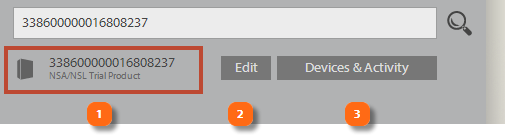
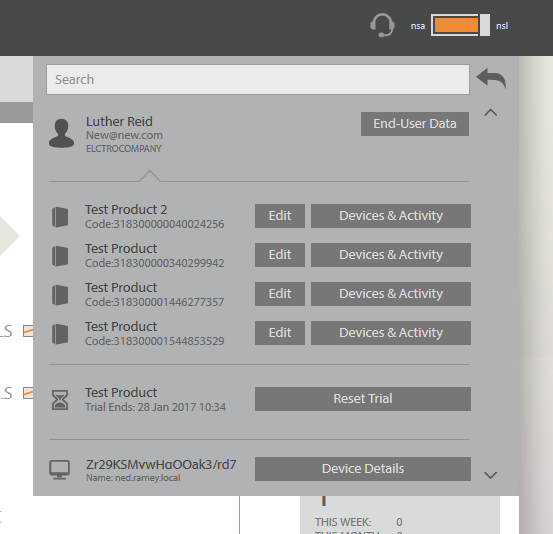
The search will offer you the following options:
- The matching code
- A button to edit the entitlements on the code
- A button to review all the devices attached to the code plus activity history and the analytics for the license
Additional Search options:
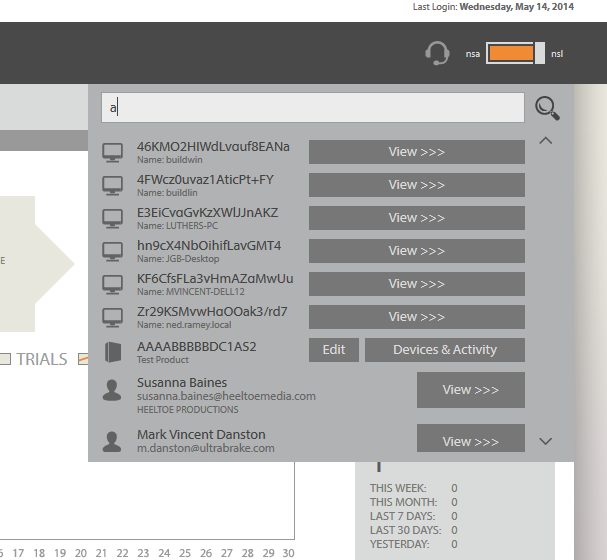
Search is very powerful and can also display other useful results about your Users too, if you have collected it, such as:- Computer ID (DeviceID)
- End User – First Name
- End User – Last Name
- End User – Email
- End User – Company
Search by Computer ID (DeviceID)
This is a very powerful feature to understand, support and manage your user's devices, all of which we identify through ComputerIDs. The user can give such an ID as generated by our API on the client, and you can then easily search Zentitle for more data about that device.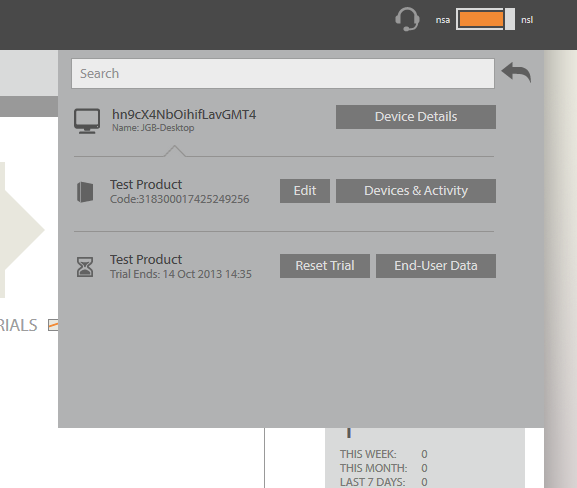
On searching you see any associated License Codes (each one shows you the Code Number and the associated Product). You can then Edit the Code, or view ‘Devices & Activity’ (which is helpful as you can then see which other Computer IDs might be attached to this Code, or have been on this Code).
Also, you can see any Trials (each one shows you the End Date, and the associated Product). You can reset the Trial from here, or view the End-User Data…. Note, you might notice there is no End-User data button next to the License Codes, this is because there might be many Users attached to a single Code. It is important to bear in mind that just because you have found a Computer ID and can see license codes, these codes could be shared by many different devices (and ‘people’).
Search by User
Obviously you can't use this option unless you have setup a process to attach your user data to the licensing and imported the data, or had it added by each customer during a registration process.
See here for more articles on this:
On this search result, the End-User is listed at the top and there is an End-User Data button next to him/her.
The same real world person would appear as several unique results if she has registered the same details on different devices.
So, on this view, you also see, the License Codes belonging to associated Computer IDs (DeviceID) for this End-User.
Finally, you will see Trials, but, note that the ‘End-User Data button’ doesn't appear next to every ‘Trial’, as it appears at the top, next to the End-User.
The License Management Dashboard
As an alternative to a quick search you can use the license management section.Click on the "license management" icon (as shown below).
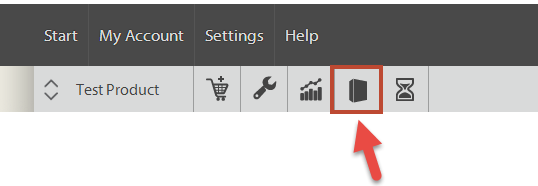
The you will be able to see your Zentitle License codes in a list where you can review activity and devices attached to the licenses or edit the rights and entitlements on the licenses.
The main part of the license management dashboard is a table with several columns giving information about each license code:
- LICENSE CODE: The license code itself. This is a linkbutton and clicking this will allow you to edit the properties of this license code.
- AVAILABILITY: Whether the license code is enabled or disabled. A disabled license code cannot be activated or have its activation refreshed.
- ACTIVATIONS: This gives the current number of activations of this code out of the maximum possible number of activations.
- PROFILE: This tells you to which (if any) code profile this license code has been assigned.
- COMPANY: This tells you which (if any) company this license code has been assigned.
- EXPIRY DATE: For non-perpetual licenses, this gives the expiry date of the license code, which can be a fixed expiry date or the end of a subscription period.
In the 'Actions' column there are two buttons:
- The DEVICES & ACTIVITY button. Clicking this will give you information about devices and activations that have used this license code.
- The DELETE button. This will delete the license code. Note that this is only possible for license codes with no current activations.
The license code table is paginated. Below the visible page of this table, you can select the previous or next page by clicking the 'Prev' or 'Next' buttons. You can also go to any page by entering the page number in the 'Goto Page' text box and clicking the button.
You can select the number of codes per page from the dropdown menu below. The options are 10, 25, 50,100, 250 or 500 codes.
You can filter license codes using the radio buttons labelled as follows:
- Show All Codes: Shows license codes with any activation/enablement status.
- Enabled Only: Shows only license codes which have been enabled.
- Disabled only: Shows only license codes which have been disabled.
- Activated only: Shows only license codes which currently have at least one activation.
- Unused Only: Shows only license codes which have never been activated or marked for in use by webservices.
You can also. using the dropdown menus, further restrict the license codes to be viewed to be those belonging to a certain profile, associated with a certain company, having a certain concurrency mode, or any combination thereof.
Editing a license code entitlement
Even though you allocate your licenses during the initial product setup, the great thing about Zentitle Licensing is that you can also control licensing and entitlements at a granular level here on a single license (code). In this way you can offer each user a unique experience and set of rights depending on your own business model.- Click on the license code link button that interests you. Doing do will take you to that license code's 'Edit Code' page.
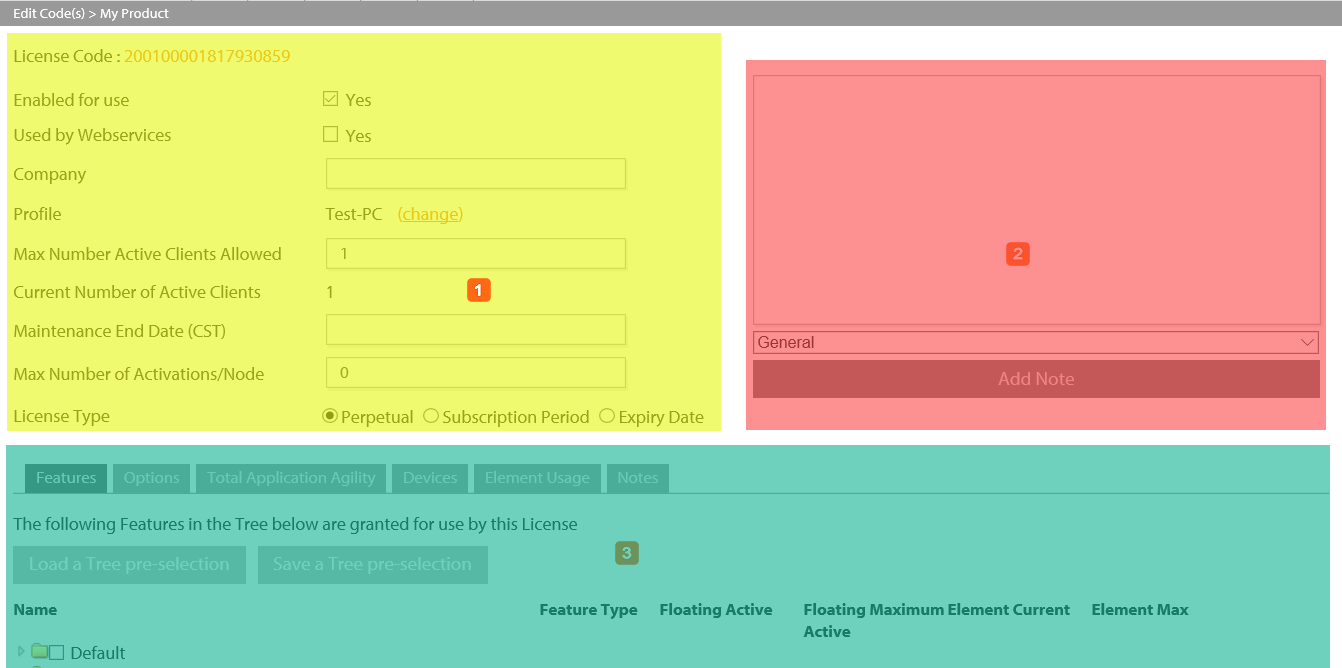
Once you have this page open with the selected code, you can see 3 sections you can use:
- The main entitlement area for each code.
- The notes panel.
- The advanced feature control panel.
The main entitlement area

- Review the license code number.
- Enabled for use - Set the "availability" of the code, this is either enabled or disabled. De-selecting this option ("Disabled") prevents any further use of the code.
- Used by WebServices - If this is set then you will be editing this code automatically via the WS API. This could cause a conflict if you also edit it here so be aware.
- Company - If set, this is the company (i.e. customer) to which this license code is assigned.
- Profile - This is the profile to which this license belongs.
-
Max number Active Clients Allowed - This is the number of active clients that can use your app. at any time, usually set to 1 or 2. The default is 1. (This is often called the activation limit, the site install limit or EULA limit).
Max Active Clients per Code: 50000
- Current number of Active Clients - This is the reported number of clients active.
- Maintenance End Date - This is the date set for this license maintenance renewal. or your internal license review date, it's not a hard license parameter but a reference date for your code to set a number of actions on the client e.g. to alert the user to renew.
- Max Number of Activations/Node - This should be set to the number of simultaneously running activations on a single machine that should be allowed. If set to 0, the number is unlimited. When this is so, the number of activations remaining will be returned on the client side as 1.
- License Type - the type of license model for this code i.e. its either a Perpetual, Subscription Period or a fixed Expiry Date. Clicking on each radio button gives different options.
Setting the license type
You have three main license types: Perpetual, Subscription Period or a fixed Expiry Date.
Perpetual - Selecting the Perpetual license state is simple, there are no additional options.
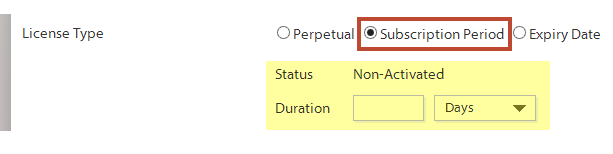
Subscription - Selecting the Subscription Period license state offers you a further option to set the "duration" in days before the license expires and requires re-activation.
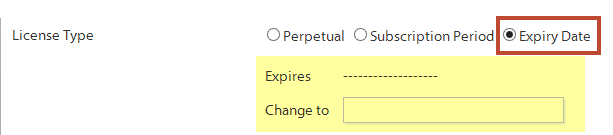
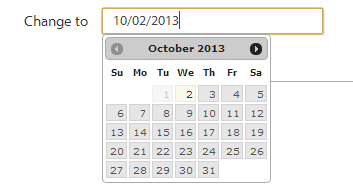
Expiry Date -Selecting the fixed Expiry Date license state offers you a further option to set the fixed date in time the license will expire and require re-activation.
The notes area
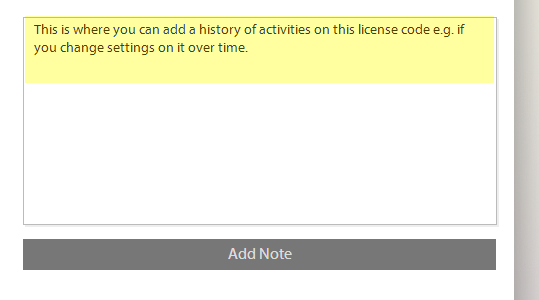
This area is where you record notes on how this license has been setup, sold, editing or managed over time. A mini-licensing CRM system.
Simply add your note and click the "add note" button to record it.
To review the notes on the license, go to the notes tab in the advanced feature control panel.

Clicking on the notes tab will show you the history to date, all timestamped for your reference.
The advanced control panel.
This area of the page allows you to view and edit the features enabled on a license code, set options, set the advanced "total application agility" user defined fields associated with the license, review the attached devices and review notes.
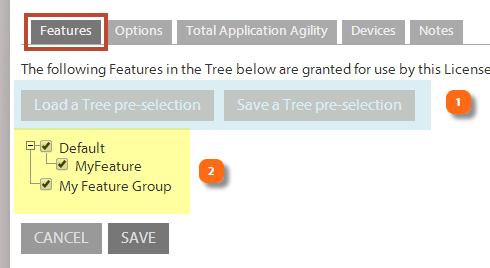
Using the "features" functionality
You can control how features are licensed within your application here.- Using the "load a Tree..." and the "save a Tree..." buttons you keep a record of what you added previously to save time and re-use those feature trees.
- The features tab shows you the features enabled, de-selecting these features will remove them from the client after the next call back to the server. Selecting them achieves the reverse of course.
Options
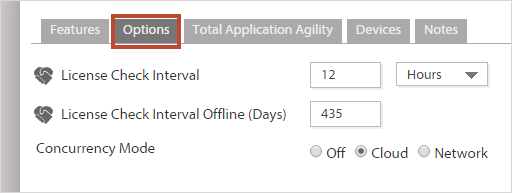
Online licensing and the License Check Interval
If you design you application to use online activation, it contacts the server periodically to refresh the license. This period is known as the License Check Interval.
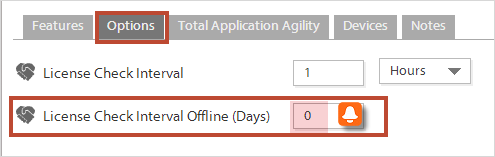
License Check Interval (Hrs) - This is period between call backs to the server. The lower this number is, the higher the security.
When this is set to 0, the license will never expire. Then, if your customer(s) are offline, the local license is valid forever. The application will not need to contact the Zentitle server again.
However, you may want your customers to refresh their license settings periodically. You can do this in your application on startup to test the internet connection using the client API calls NSLTestConnection(). If the connection is OK, then call NSLGetLicense() to refresh the local license. This will update features, total application agility fields, license status (e.g. if expired) etc.
Our online activation system has been designed to enable you and your customers to get best of both worlds: if your customer are online you get the ability for the license to refresh on app start whereas if offline then they can stay offline for as long as they want (but wont get license setting refresh until online again) without connecting to our server
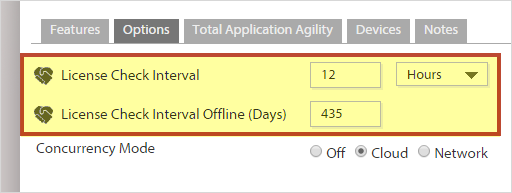
License Check Interval Offline (Days) - This is period between call backs to the server for "offline" users only. This should be set to a low number for higher security. Client Lease Period settings: These settings allow you to configure the client lease periods:
- At the "product" level for Trial Licenses.
- At the "license code" level for Activated Licenses.
Caution:
Setting the Networking capability on a License
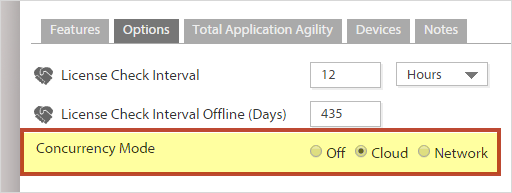
See the article "Concurrent Licensing (Cloud)" for more details on Networking.
The Total Application Agility control panel.
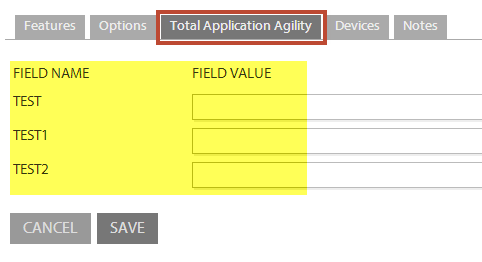
If you have used the "total application agility" functionality (when setting up the product) with this code then these user defined fields will be available to edit on a per code basis here.
See the help article about "total application agility" for more details.
Devices
You can see all the devices (PCs etc) attached to this license code here.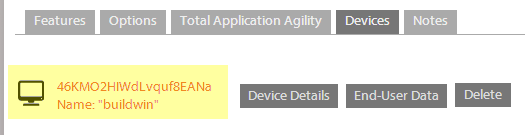
Review a license code history and analytics
Zentitle offers you some deep insight into what every installation of your product is doing, as well a dashboard that shows you an overview of all of your products and licenses.which will then show you the Device Activity page detailing the license code's activity history:
If you are reviewing a code with no activity like may be the case during a trial or testing, you will simply see no records as above.
When there is activity on a license code you will then get some data and buttons to go deeper into the analytics of the specific installation or to delete that user installation from the server.
The License Code itself, with an 'Edit' link button to the Edit Code page.
Availability of this code, active or disabled
Whether this is being externally controlled by Web Services (and therefore you should not manually edit.)
Computer (Device) ID - This is a proprietary number created by Zentitle to uniquely ID a client side installation. Plus Device name - This is data collected from the user machine and is the name entered by the end user.
ACTIONS
Understand the hardware, system configuration, platforms, operating systems and locale the majority of users are now on so you know how to target your new product engineering.
The system details section has three main areas:
- The "environment" data from the machine such OS, CPU etc.
- The "geographic" details about the location of the installation.
- The "application" information such as data from the field on versions and status.
The "environment" data
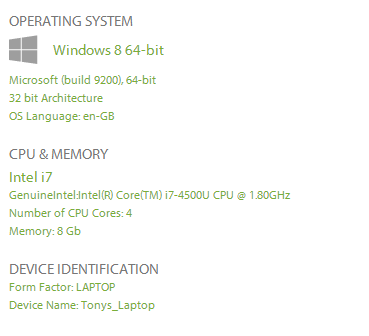
Insight into your users' environments lets you support the technologies which really matter and allows you to develop your software to perform optimally on most of your installed base computers.
The "geographic" details
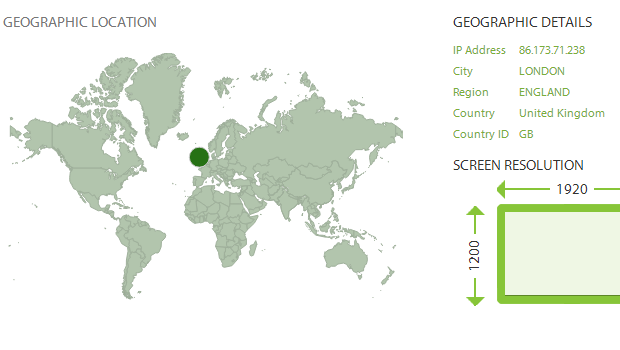
Easily visualize a complete analysis of your users based on their demographic information. Also useful in capturing users in locations you were not expecting, and shutting them down.
Use up to date version data from the field to drive decisions. See how popular each version of your application is and how important this version is comparing to the others.
The above data is very useful for you to extract useful business information and can be reviewed within the products and main dashboards.