
Introduction:
In this article, we are going to explain how to test the licensing process and client/server interactions.
There are two levels of testing with Zentitle, the initial testing where we are checking that the components are working together - we did that in the previous step when adding the code to your application and we continue that here. Then there is advanced testing where we try various license use cases to ensure a real deployment will function as you are expecting.
We recommend you do one and then the other, the latter being designed for developers who are happy working at a "deeper" level with the code and system.
Within a trial, the first test is useful to show how Zentitle works and to illustrate the basic functionality. The way Zentitle Licensing works is to triangulate between your code, our library and our licensing cloud (and license codes). So testing includes ensuring all those areas are communicating together effectively.
Hardware and OS Support
- ARM (ARMv4t, ARMv7a)
- Android 4.3+
- Linux Kernel 2.6 or newer, Glibc 2.5 newer
Gathering your resources
Before you get started on your testing, you need to have gone through the previous steps in our getting started guide.
You should now have ready in your test setup:
- Your own licensing library.
- A test application (or your own app.) that has been edited to match the library settings (Customer/Product IDs and Constants).
- A Product Setup on the Publisher Center with license codes allocated for testing.
- A set of Zentitle License Codes to test (that have been allocated to the test product).
- An example .apk coded to the product setup above for testing.
- See the Android example project for more details on getting this setup
- Test device (if testing on actual hardware i.e. Google, Samsung, other Phone or your own hardware device) and USB cable
-
Also, it is important to have reviewed the general docs for the Zentitle platforms and paradigm to understand the system under test.
Log a support request if you are having issues.
Hopefully, you will have set up and recorded all these details, so you are clear on what you are testing e.g. 1-day trial, converted to a perpetual license by activating a test license code. Plus any other tests you wish to check out after you have the basic process done.
Note the use of the ProductID. With the ProductID, you only input the last 5 digits, excluding leading zeros, into your code i.e. 6563300100 becomes 100 and 1234567890 become 67890.
Download your code example
You can download the required sample projects and code kits at the Customer Center.
Getting Started
Once you have your test machine(s) and associated mobile devices setup and your test folder with the files required you can start the functional test process.
Testing Process
The process for illustrating how the Zentitle Licensing and Analytics Service works with an Android device will be a simple test procedure to show how a license can be enabled and disabled on the Android OS as well as track that on the Zentitle servers.
This same test procedure can be used for other Android devices, and they should all work in much the same way except for some changes between versions of Android.
Any error return between 0 and -999 isn't from the library. It will be done to an invalid "security constant" values between the library you created and the sample code values you need to edit.
You can test this in a virtual test environment or by side-loading the actual devices depending on your situation.
Testing Setup and Preparation
Using Android Studio and virtual devices is the easiest and most effective way to do quick testing, but we do also recommend a full test of any shipping hardware of your own as well. In licensing sometimes, you need to test the actual "product" package (by side-loading the .apk test files) vs. only using virtual environments as they can differ in certain cases i.e. you can never be sure the virtual version will work exactly same in the real world.
Warning
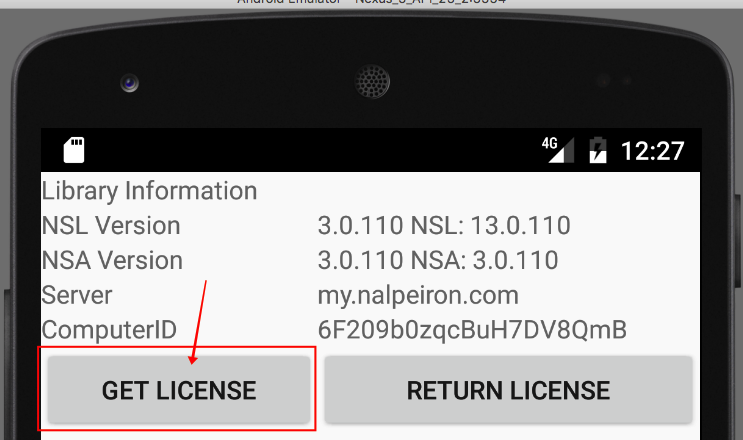
In order to use the sample code and not get odd error situations, you MUST ALWAYS click "Get License" between tests within the UI.
Testing Setup using Android Studio
After you install the sample Android code from Zentitle and run that you should get a simple test UI as below.
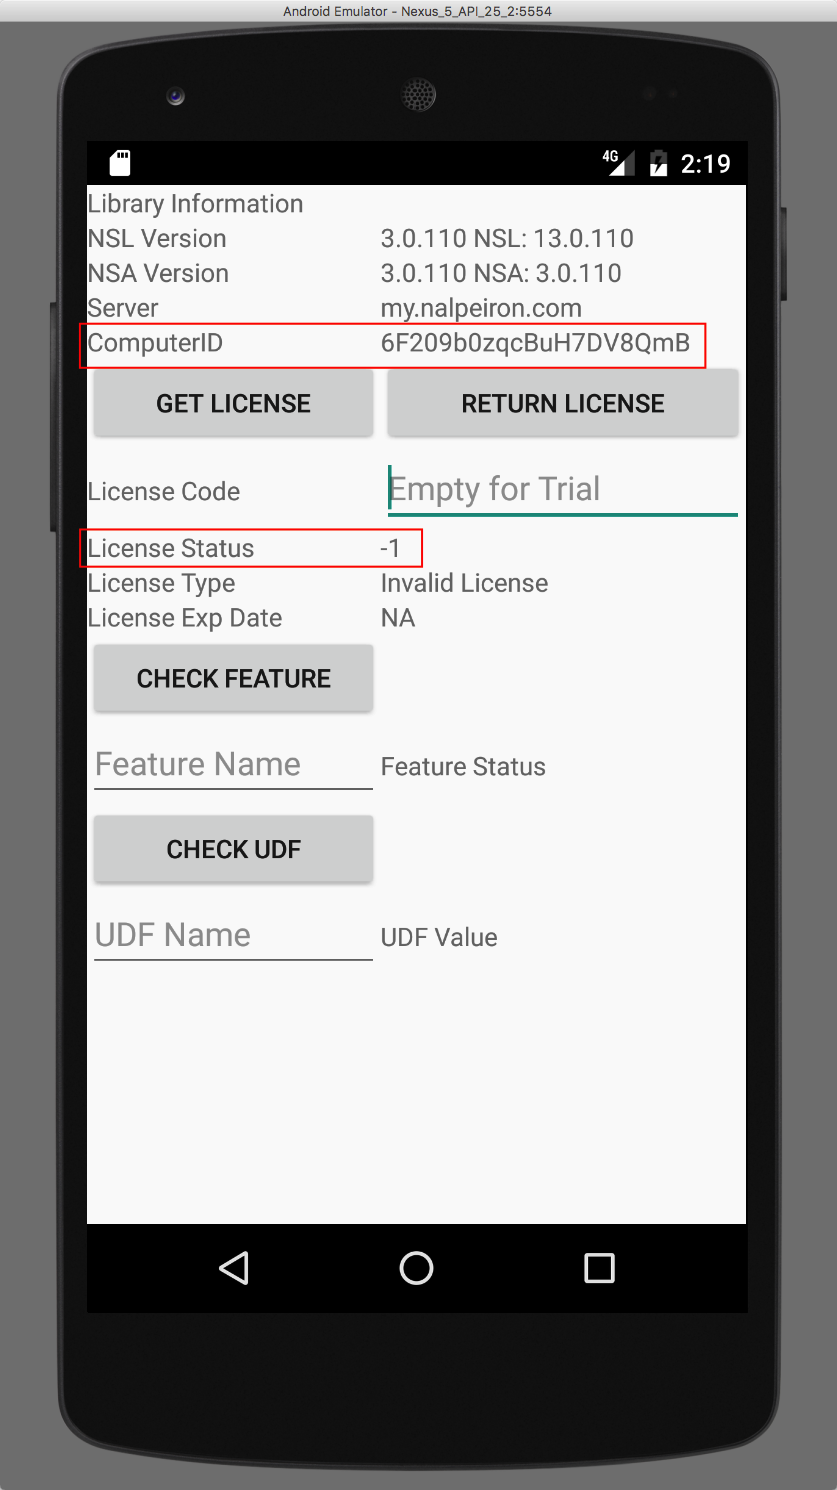
In the UI provided by the sample code, you will now review various "license status" return numbers, their meanings are below.
- When you start the test app. for the first time you will note it shows:
-1 (license expired) in the UI as the device has never connected to the server and is not active.
Testing Return Values
We can see this on the test app under the “license status” Possible values:
0 undetermined license state
1 active license
2 active trial
-1 license expired
-2 system time tampering
-3 product not authorized
-4 product not found
-5 invalid license
-6 license returned to server
-7 invalid system date
-8 product in invalid state
-50 no available licenses
-110 product inactive (server return)
-111 invalid trial period (server return)
-112 ComputerID has already been activated (server return)
-113 trial has expired (server return)
-114 license number inactive (server return)
-115 number of allowed activations exceeded (server return)
-116 subscription Expired
-117 duplicate device id
Another important data point is the “ComputerID” (device ID) that you can track back on the server side to check the effective transmission of data and to track this specific device in the system.
Please refer back to this table when testing.
Testing Setup for an actual Device (instead of Android Studio)
Before testing can begin the hardware device must be set up and ready to test.
This requires the device to have the .apk files sideloaded and for the device to set into developer mode and USB access enabled.
Sideloading the APK files from Zentitle
Attach the Device to a PC (or Mac/Linux system).
For example, the .apk files generated for the sample code are located here:
- /Users/JGB/Desktop/AndroidCodekit/nslTest/nslTest/build/outputs/apk/nslTest-debug.apk
Where the sample code was stored on the desktop of the test machine.
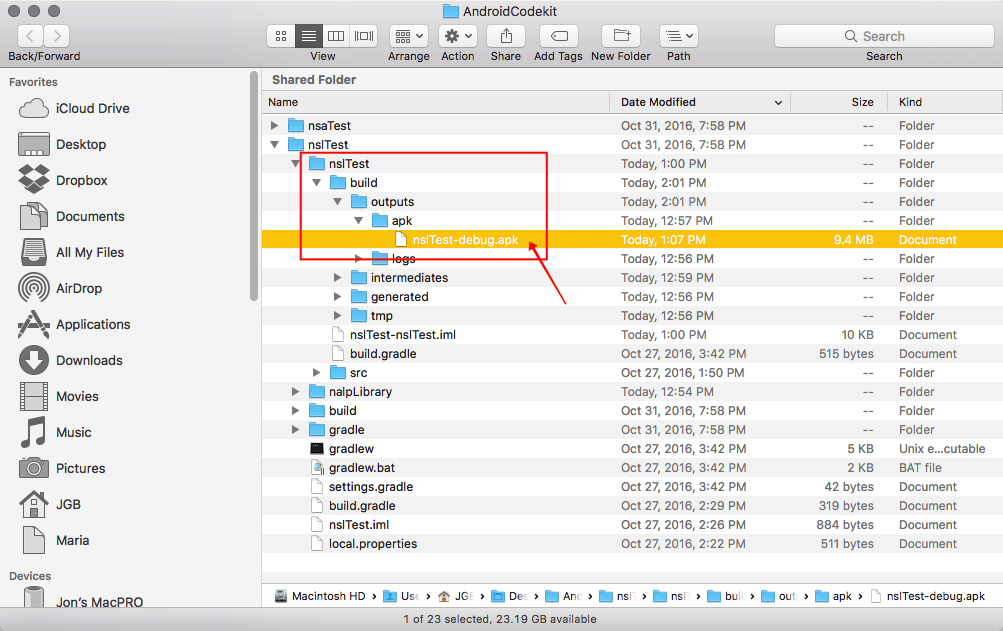
The two Nalpeiron files below need to be loaded into the storage on the device:
- nslTest-debug.apk
- nsaTest-debug.apk
This can be achieved many ways but using the Android SDK tools is recommended.
It is assumed that this process is understood, but it is outlined at the end of this document for those unfamiliar with using the Android Debug Bridge (adb) (http://developer.android.com/tools/help/adb.html).
Next steps
Once the two files are loaded onto the device, then testing can begin.
- On the Device start the Android OS and sign in.
Navigate to the apps screen and review the apps looking for the “NSL Test” and “NSA Test” icons.
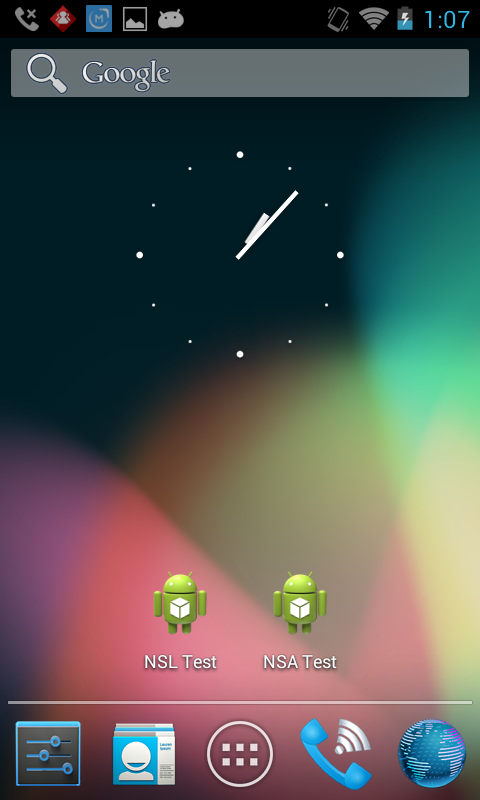
- Click on the NSL Test icon to start.
This will show the test UI where we can quickly review license data/states and also send data back and forth to the server side.
Setting up the Service-side test environment
No matter if you are testing in Android Studio (ADB) or on the device you will want to see what happens end to end. So the Server side needs to ready for you to switch back and forth and note changes in both UI.
The server side at Zentitle offers both an Analytics and Licensing capability. In this test we will check the License data and control in action.
- Go to https://my.nalpeiron.com
Use the credentials provided to access the server side.
It is assumed that the tester understands the Zentitle environment and how it functions at least in a basic sense to conduct these tests if more training is required on using the Zentitle service.
- Navigate to the "license code page" where you should have sourced some test license code numbers.
- In "licensing" testing, we will reference these codes on this page, or by searching for the codes in the Zentitle UI server side to review changes during the test phase.
- When we test Analytics we can also ref these devices to show details within the specific device we are testing with, you can easily identify the device by its unique "device ID" as shown above in the sample code UI.
In this example, we are going to test with the Zentitle license code number: 461300000045470685 attached to the device ID: 6F209b0zqcBuH7DV8QmB
In addition to full license states we will also test the "trial" state and these will show up in the "trials page" and do not require a license code, therefore you will only see device IDs listed here across all trials associated with this "Product" in the Zentitle UI.
- Navigate to the "trial page" where you will see all devices attached to the server in a trial "state". For testing we are watching for the device ID: 6F209b0zqcBuH7DV8QmB.
Testing the licensing
The first logical step in testing the licensing is to test a trial, if you plan to use demo periods, as once you start using license codes, you will invalidate this test.
Testing trials
In testing Android app. trials you do not use a license code, you simply deploy the device to the user, and they can start a trial period set for that “product” within the server-side. Each device will be treated uniquely and have a trial period logged against the Zentitle ComputerID tracked server-side.
To set a trial period, you will need to configure a “product” within the system (or you may use “profiles” or edit individual license codes).
We have a single test product within the system at present so we can check that and then each license code for a trial period setup.
Then you can edit the setup for this “product” in the Zentitle Service (you can change a specific license later).
This is a screen showing the trial settings for the “Device test” setup in the server-side. So these are the trial “days” you need to test against. In this case, the setup shows a 1-day trial period.
NOTE: In most test scenarios you will want to choose a trial period of 1 day so that you can quickly see the timeout response working correctly i.e. the dialog/api that you will use to get users to buy or activate their products at the end of a trial period.
Starting a trial (on the device)
- To start in Android Studio run the sample app. and review the UI.
- Then you will see the first NSL Android screen (using the test app.). Here you can see the UI shows a range of useful data.
- In this case, the starting “license status” is -1.
Note: All the tests should start with a screen like below with a “license status” of -1.
- Next, click on the “Get License” button with no license code on the dialog box (where it says empty for trial)
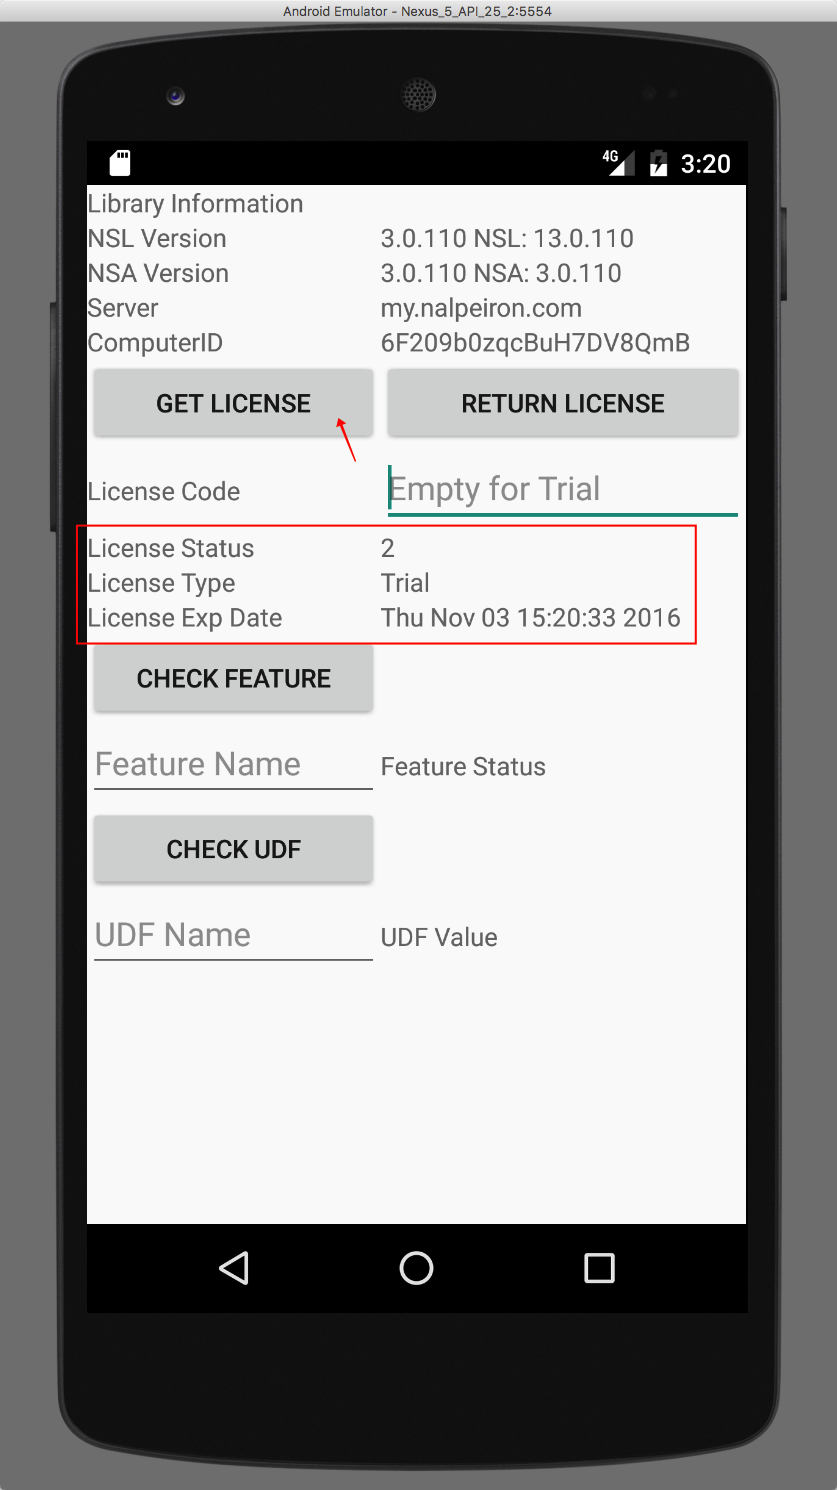
Once you have clicked the button, the device will connect to the server (for the first time in testing) and will set a trial.
In this case, the trial was set for a 1-day period as we can see the device is reporting a trial end date of Thu Nov 3.
We can also see the license status is set to 2.
2 active trial
NOTE: Remember you can only start and run a trial before you activate, and you need to leave the dialog empty to start a trial.
Checking and resetting trials server-side
Once you have started a trial on the device you can check the server for details.
To search for the device and its “trial” mode status (before you attempt to activate using a license code) input the ComputerID for the device into the server-side and click the search button.
You will then see the trial status of that device and can see the expiry date and also reset a trial.
6F209b0zqcBuH7DV8QmB
So we can see the device and the server are in sync. And the trial is working correctly.
Note: If you have already activated this device using a license code you will not see this result in the search as the trial with have been terminated and converted to an activated state instead. In the example above the first device in the list in the "activated" state. The last in the list is our test device.
- We can also see this reported on the “Device Details” page.
At this stage, the NSA analytics has not been run and therefore the data about the device noted in red has not been sent to the server.
Checking the trial expiration process
Now we need to check that the “trial” status times out correctly, per the settings.
Assuming you set one day, we have waited past that 24-hour period and are ready to check the status again.
In this case, we are going to test manually by clicking the “Get License” button again but if the lease refresh rate were set at less than 1-day (as would generally be the case in production) the device would already be reporting an ended trial.
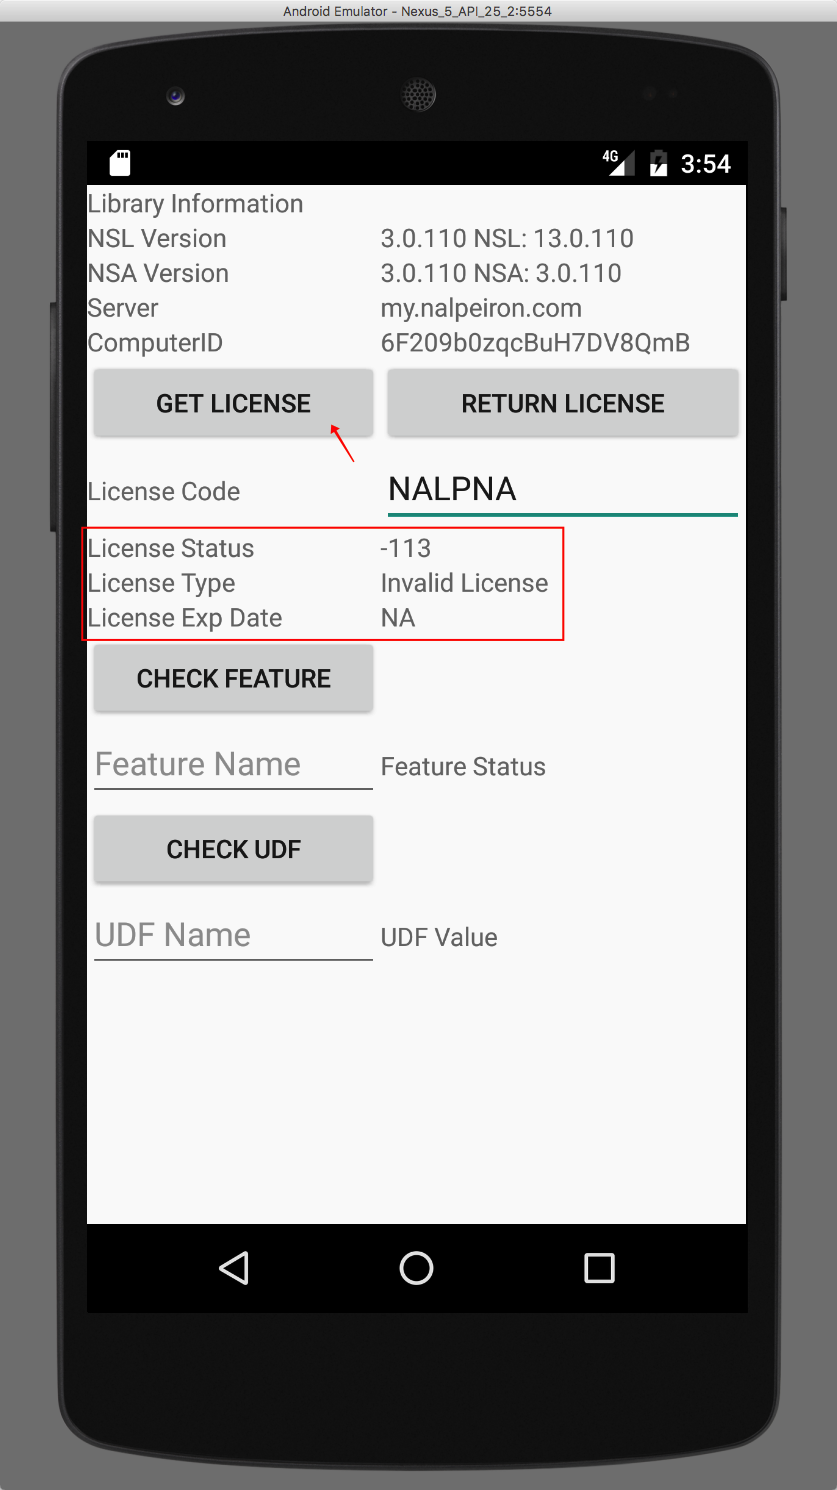
Here we can see the trial license has expired. “License status” is -113 (in your UI you would display a dialog telling the user to buy or whatever the next step in your business process is after the end of a trial period).
-113 trial has expired (server return)
To check the trial status of this device on the server-side navigate to the “trials dashboard” (see the hour glass icon) and find your device ComputerID: 6F209b0zqcBuH7DV8QmB to review the “Status”.
Here we can see the trial “expired” after one day as expected.
This is the end of the trial testing for this period.
Resetting and retesting a trial period
You can reset a trial period for further testing by searching for the ComputerID and clicking the “reset trial” button on a device. This process will remove the trial data from the server side.
Once reset the device can then start a trial in a “fresh” state to enable retesting.
Testing an activation using a license code
After testing a trial period, the next test is to set a license on the device.
Again the license rules and parameters can be set for every license code, in this case, the test code has been changed from the standard “Device test” setup as below to show how a code level change is possible for license rules.
Getting a test code and checking Its rights
First, you need to source a test license code from the dashboard.
- Navigate to the "license code page" where you should have sourced some test license code numbers.
- In "licensing" testing, we will reference these codes on this page, or by searching for the codes in the Nalpeiron UI server side to review changes during the test phase.
In this example, we are going to test with the Zentitle license code number: 461300000045470685 attached to the device ID: 6F209b0zqcBuH7DV8QmB
- Click "Devices & Activity" button to check this is a fresh unused test code.
- Then, Click the “Edit Code” button to check that this code doesn't have differing rules to the "product" template you set up. It's possible to set different entitlements per code so that's why we check now to ensure the integrity of the testing process.
Now you can review the code details, which may be different to the generic product setup.
Note: you must always check the rules you have set on a test license code to ensure your testing data matches the server-side setup.
Setting the license activation on the client-side
So we know we are looking for a change on the client that shows a “perpetual” license type from a trial state (not to be confused with the server call back lease period we use to check the license periodically).
- Note the test code you will be using from your Portal page and navigate to the test UI.
- Click the “License Code” dialog box to launch the device keyboard and type in a test license code. In this case, we are using the code below:
461300000045470685
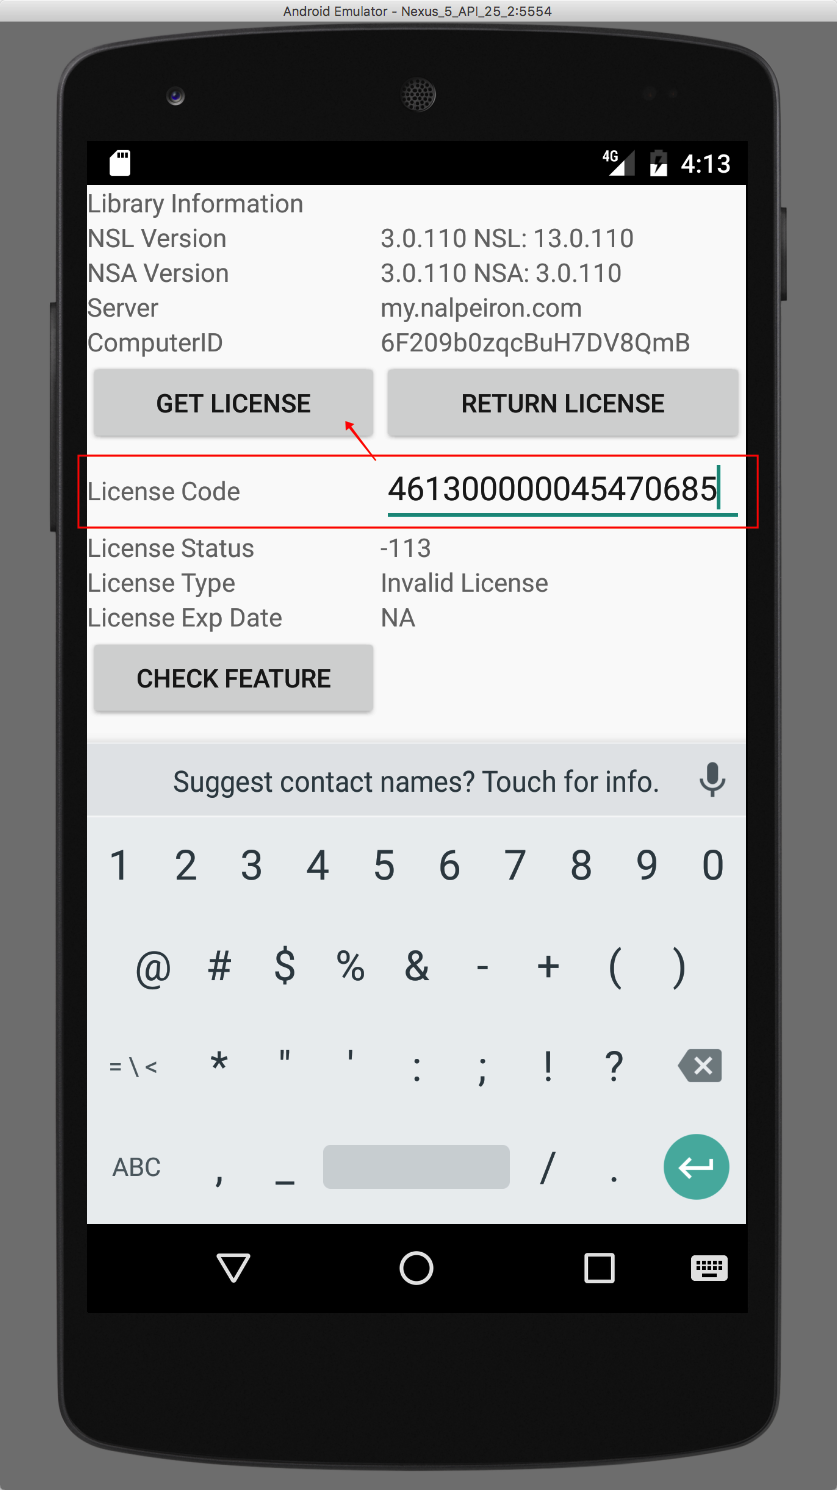
Make sure you type this number exactly as you find it on your own Portal page.
- Click the “Get License” button to query the server for this license.
After clicking the “Get License” button, you should observe the License status change in the app.
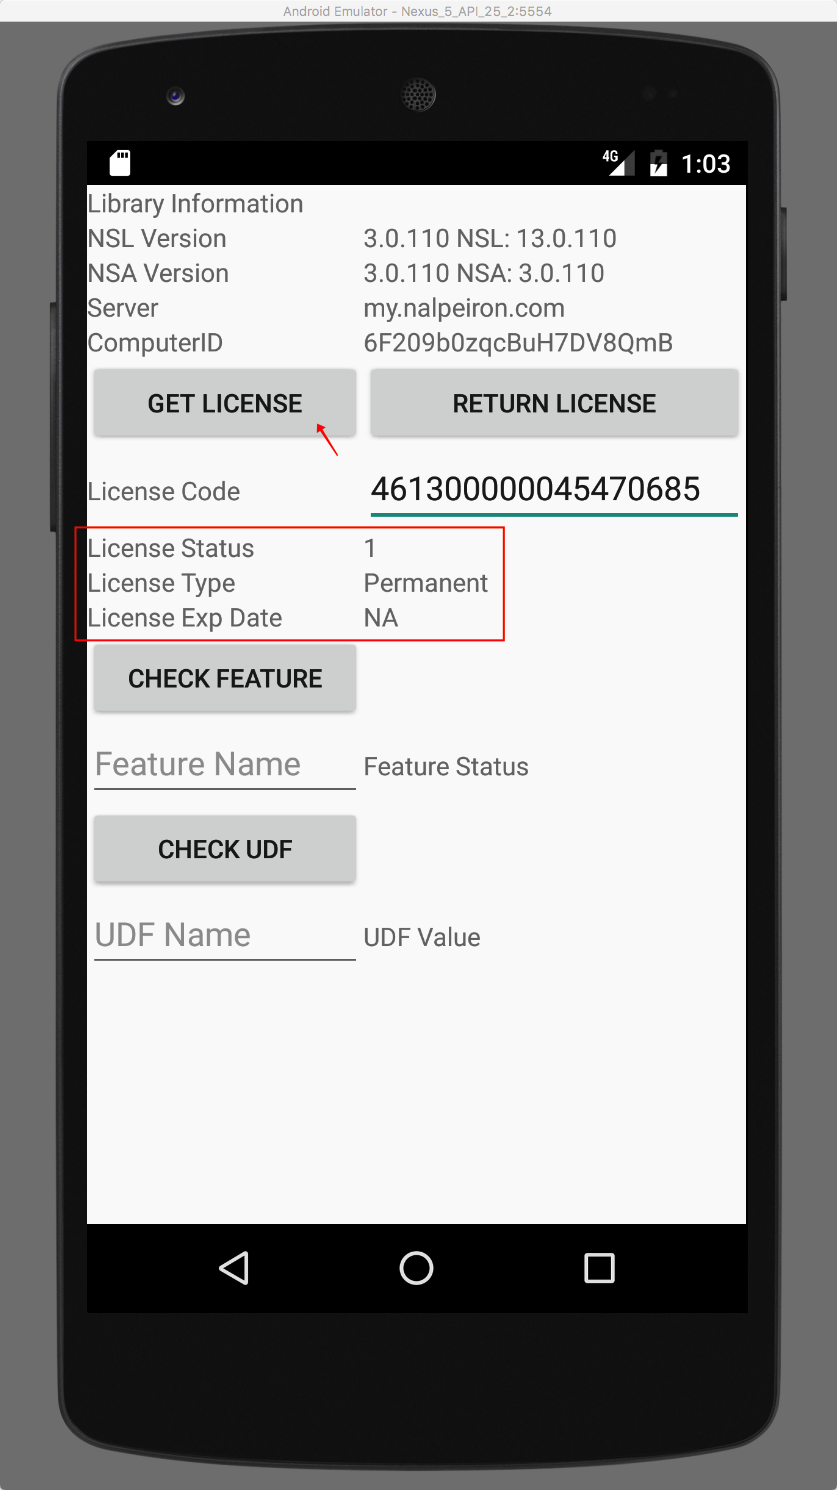
In this case, we can see three areas change; the status is now 1 = “Perpetual license”; the license expiration date has changed as has the license type.
These are parameters set for this specific license code number on the server.
1 active license
Reviewing the server side test results
Now let’s navigate back to the server side and see the status of the Licensing.
- Go to https://my.nalpeiron.com
Use the credentials provided to access the server side.
Checking the license status on the server side
Now we have data we can navigate to the NSL licensing dashboard.
Once in the NSL dashboard, you need to use the toolbar or “search” for the license code we are testing or the device (ComputerID) to check the results of the test.
- We are check for activity on code: 461300000045470685
This will find the code in the system and allow you to either “edit” the license parameters or review the device and activity on that code.
- Click the “Devices & activity” button for this test.
- Now we can review any devices that have used this code and their status, in this case, we are looking for device: 6F209b0zqcBuH7DV8QmB
On this page, we can see that device along with its status and related timing for the license lease.
So the testing is working, the device status is correct at both ends, the data is passing to the server, and the server is showing the details of the device and the license status as we see it on the device.
Continuing the testing with de-activation on the client (rehosting)
Leaving the server side screens open, we can now return to the device and try removing the license from the device (de-activating) and testing that part of the process is also correct.
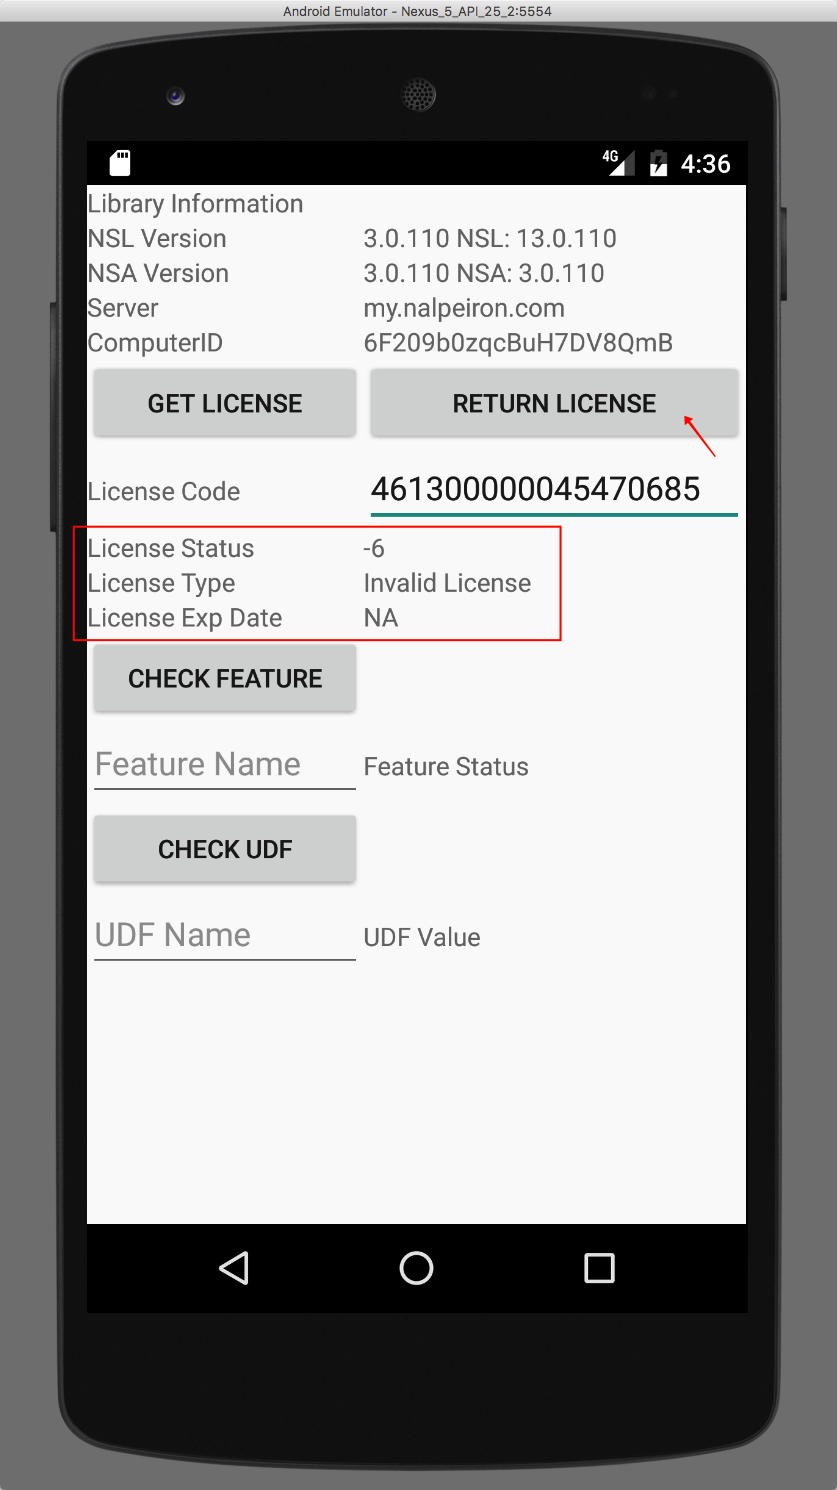
On the device screen (still using the NSL Test icon) we can return the license by ensuring the code number is still in the dialog box and it’s the same code number.
- Click the “Return license” button, and you should see the local license status change again.
Here it's showing the “status” is -6, or that the test license has been returned to the server, so the license is in a de-activated (unlicensed) or Invalid license state.
-6 license returned to server
Checking the server side for de-activation confirmation
Once again on the NSL dashboard, if we kept the screen for the device ID or the license code number we will see the status change after we refresh the page
In this case, we can now see the Computer ID is struck through showing a de-activated device as expected.
De-activated devices are struck through for ease of identification
This concludes the basic tests. We have successfully tested using a trial period, setting a license on a device (as a perpetual license) and removing the license from the device for re-use.
Further advanced testing
You can now go on to test more scenarios like other business models, features, concurrent licenses and more.
Testing different license types (perpetual, subscription and fixed end date)
On each license code, you can set a different business model e.g. perpetual, subscription, fixed end date and concurrent. We have tested perpetual models above.
Testing subscription models
To test a subscription based license you need to edit a license code and set the parameters below for testing, then activate using this new code and check the results.
- First, navigate back to the Publisher Portal and choose a different code to the one used earlier
- In this case: 461300000059459438
- Now click "Edit Code" to change it's base "perpetual" settings to a "subscription period" based entitlement.
- Set it to a duration of 1 day and click "save"
- Now we can activate this code: 461300000059459438 on the client device and check the license state set and time to subscription end for 1 day.
- On the client device enter the new code and click “Get License”.
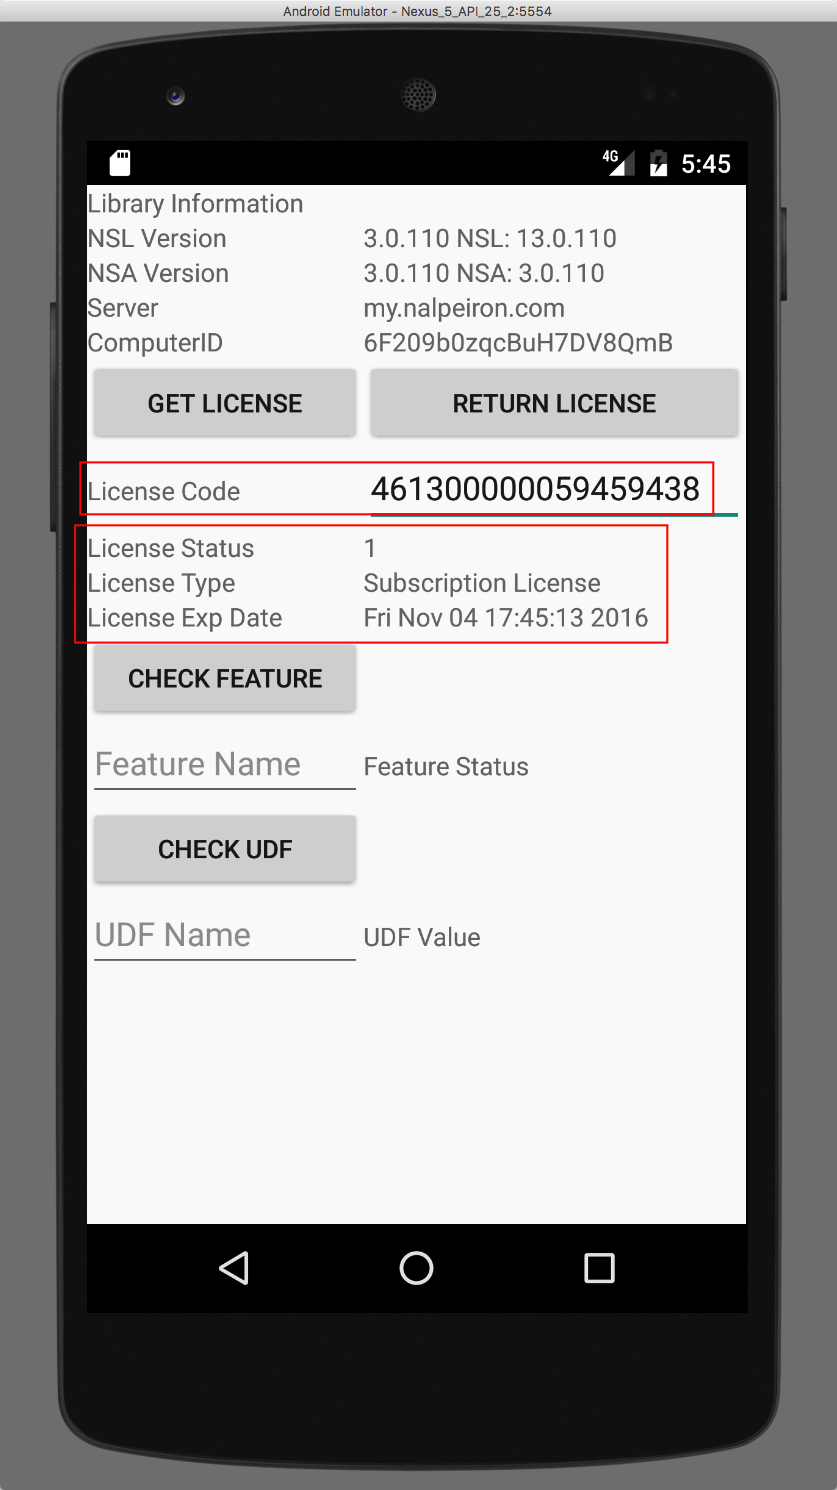
The results show a switch to a License status: “Subscription license” with a license status: 1 (licensed) and a License expiry of a day later.
1 active license
- Check back on the server-side against code: 461300000059459438 using the search method previously shown, find the code and click the "edit" button.
The license code page gives us details on the “timing” for the device that is activated on this license. This matches the end user device UI as well so the service is working correctly.
Checking the subscription times out at expected
Now we will wait for the 1-day period and check again to ensure the license times out as expected.
- Once again click “Get License”
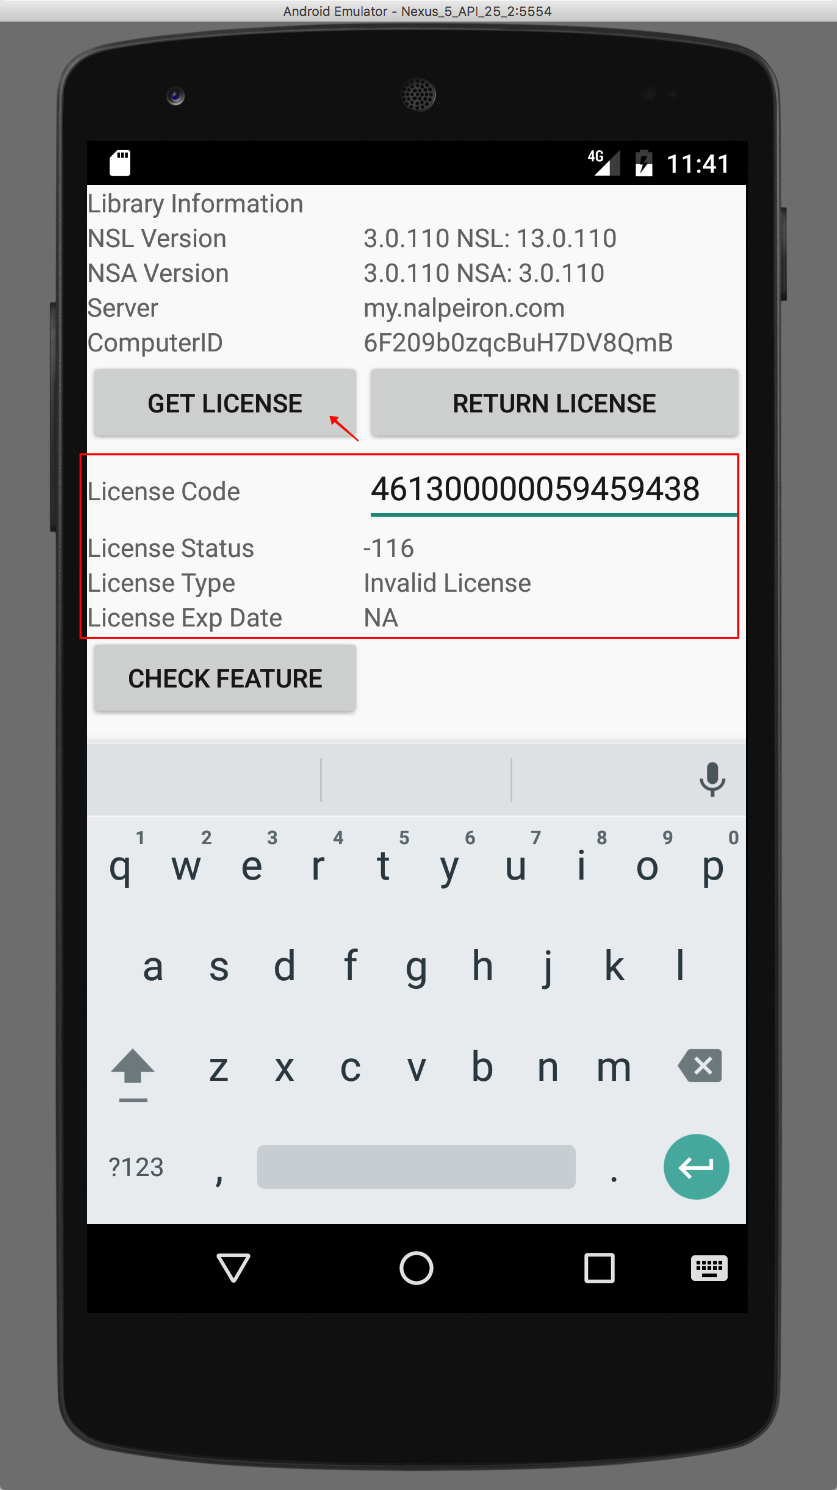
Now we can see the license has timed out as expected and is reporting license status is set to -116 (expired)
-116 subscription Expired
Checking back on the server-side against code: 461300000059459438 we can confirm server-side that the license has expired.
Testing fixed end date
To test a date based license you need to edit a new license code:461300000066305598 and set the parameters below for testing, then activate using this new code and check the results.
In this case, our license is set to end on the date of 11/05/2016.
Note: The date set on the server-side is for 12:00 CT. As the testing is from Palo Alto (PST) the device is reporting it’s local time and showing a date/time of 2 hours different i.e. the device shows the 4h at 10:00PM. This is correct!
- Now we can activate this code: 461300000066305598 on the client device and check the license state set and license end.
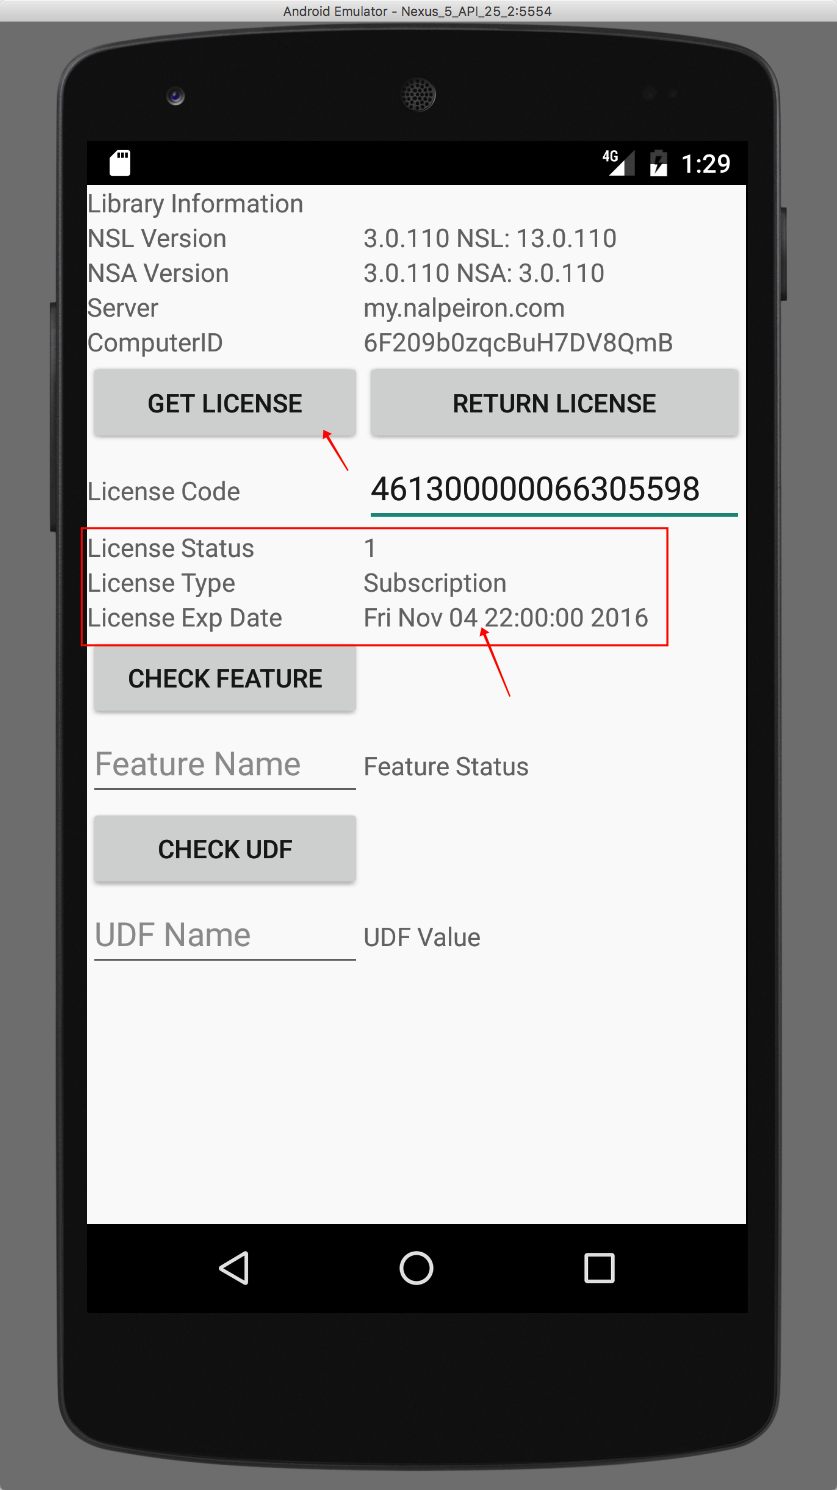
Here we can see the license status is set to 1 (active) with an expiry date of Nov 4th 22:00 (Not 5th as PST is where we are testing).
1 active license
- The final step is to wait until the expected “time out” end date/time and see if the license expires on the client as expected.
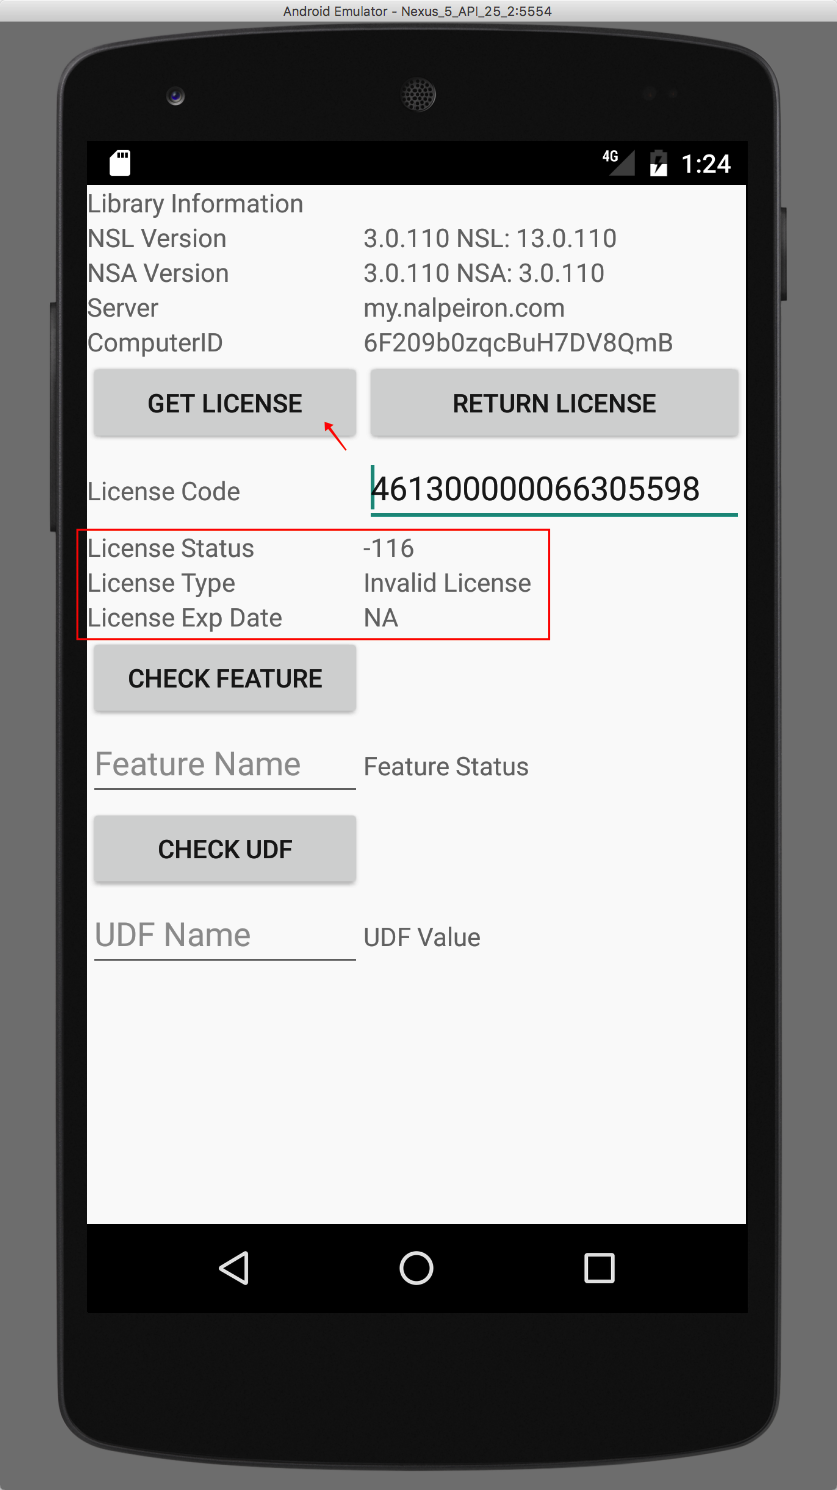
Now we can see the license has timed out as expected and is reporting license status is set to -116 (expired)
-116 subscription Expired
Testing blocking Unauthorized clients
When you set a license code you can limit the number of active devices using it (clients), we can test for this as well.
Here we can see the active client "allowed" limit is 1 and we already have the 1/1 "active".
- Testing on a new device (note the new ComputerID: SB5GHt82JF6bUQ6kGKdy), one not used before, retry the previously used code: 461300000066305598
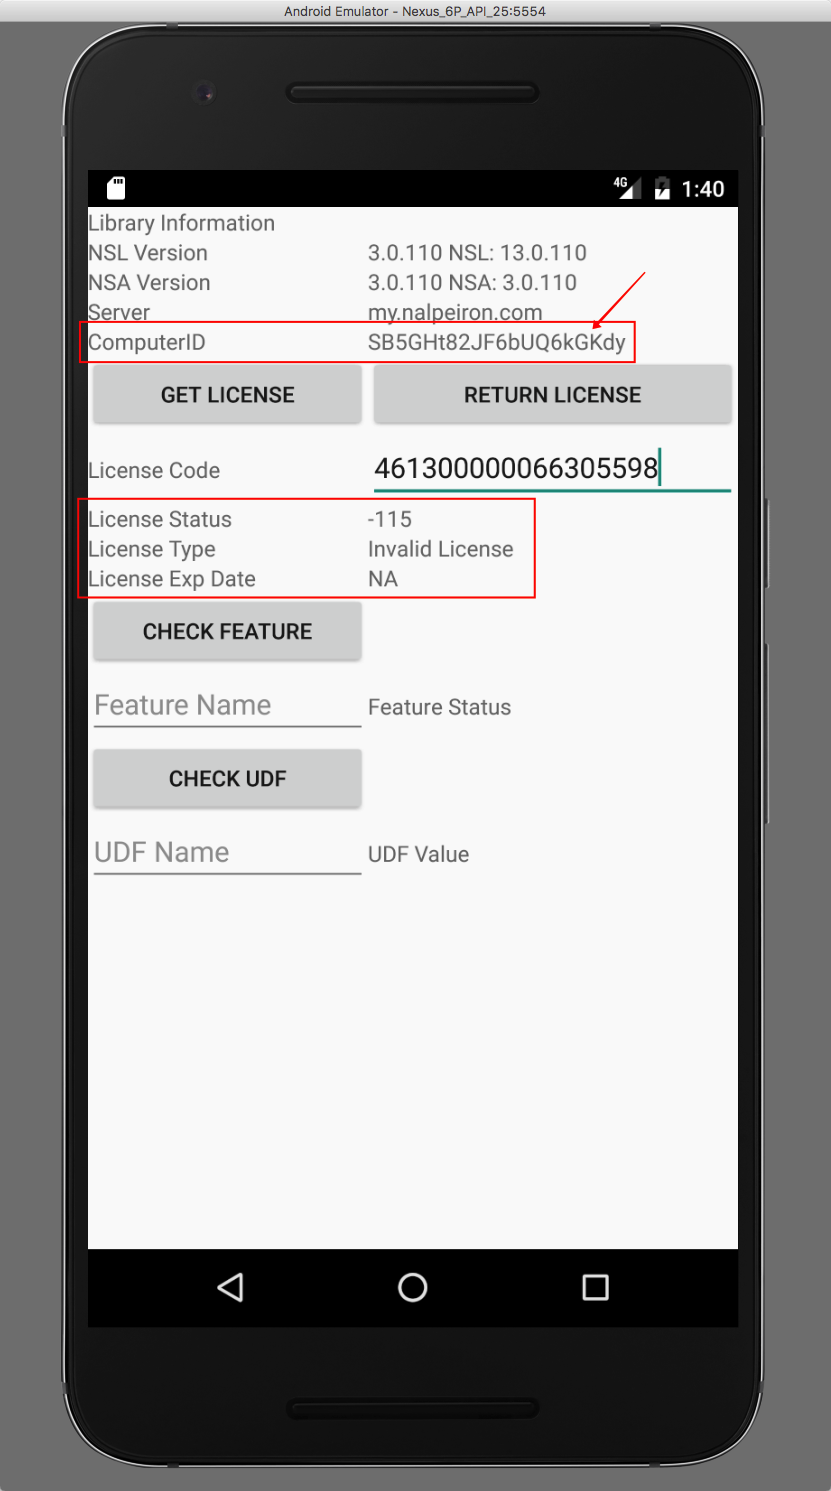
- Clicking “Get license” on the new device shows a return value license status of -115 and doesn’t allow any activity on the server. This is the correct behavior.
-115 number of allowed activations exceeded (server return)
Testing features
Now we can test the control of features on a trial and activated device.
In this test case, we have added a feature called FEAT1 to both the device and server side so we can see that being enabled.
This can be set several ways, in this case, we set it at the “product” setup level, under the "advanced options", as below.
The same feature tag is coded on the device for testing.
Testing feature Activation
In order to test control of features, you must first setup your “products” or codes to enable a set of pre-designated features tags.
In this case, we have already added a feature called FEAT1 in the test apps and the server-side as above
All we need to do to get started on testing is to edit a license code and enable the feature in trial and/or activated states.
- Find the code you wish to enable “features” via search or the license code list (box icon).
- At the bottom of the page is the “features” tab you will see FEAT with a radio button option next to it.
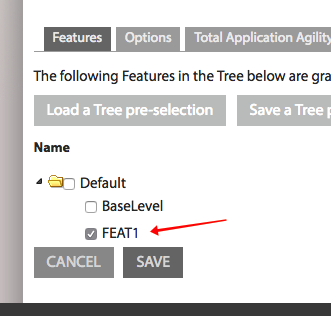
- To enable the profile with the FEAT1 feature tag select that and check the box, then click "save".
- Next, return to the test app on the device and run that.
- Enter the license code: 461300000045470685
- First, click the “Get license” button to set the perpetual license
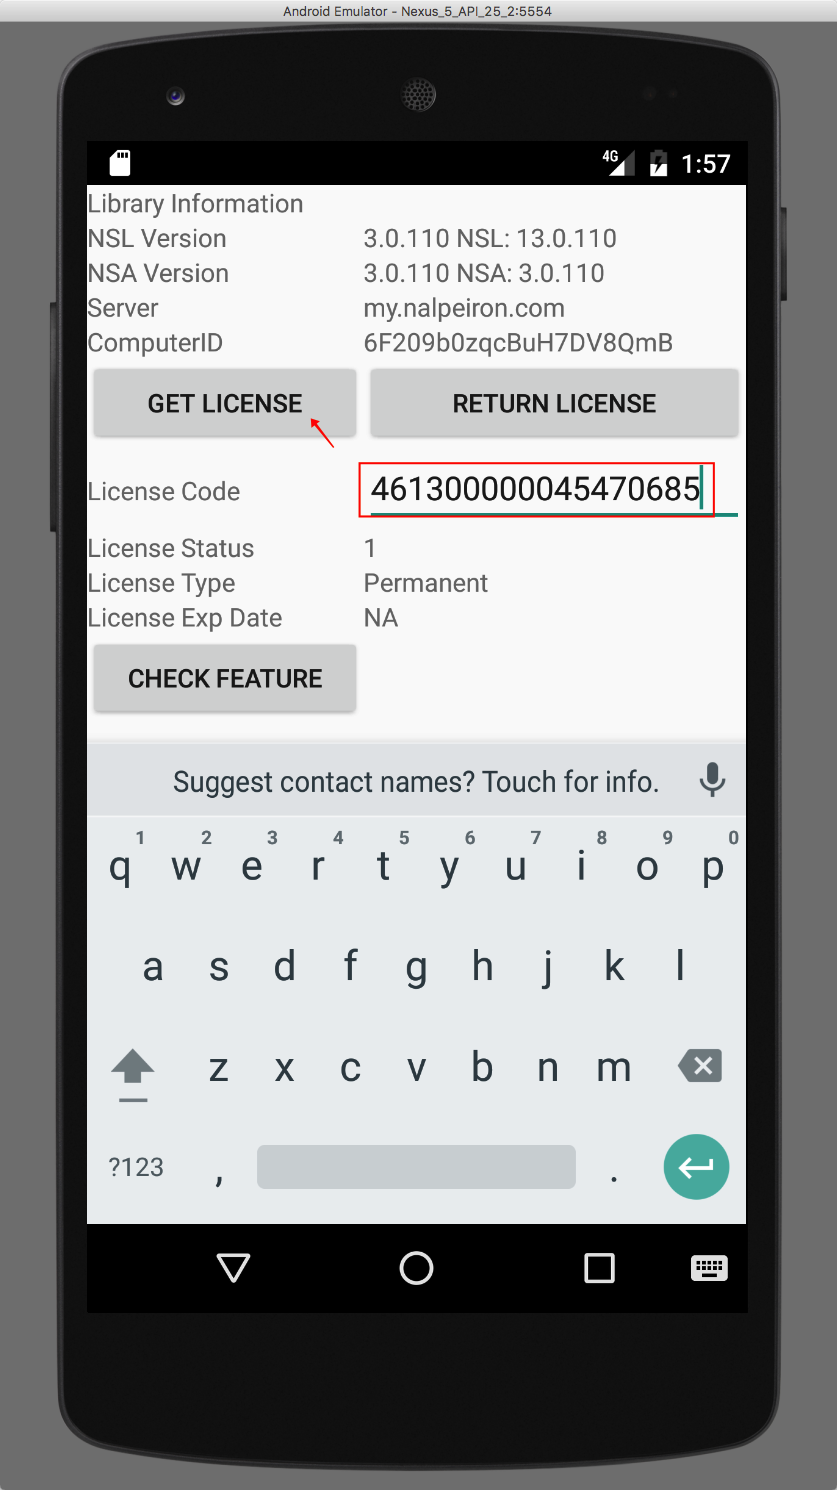
- Then click the dialog box that says "feature name" and enter FEAT1 with the device keyboard
- Then, click the "check feature" button to query the server for FEAT1 (it must be set "active" on the server to pass this test).
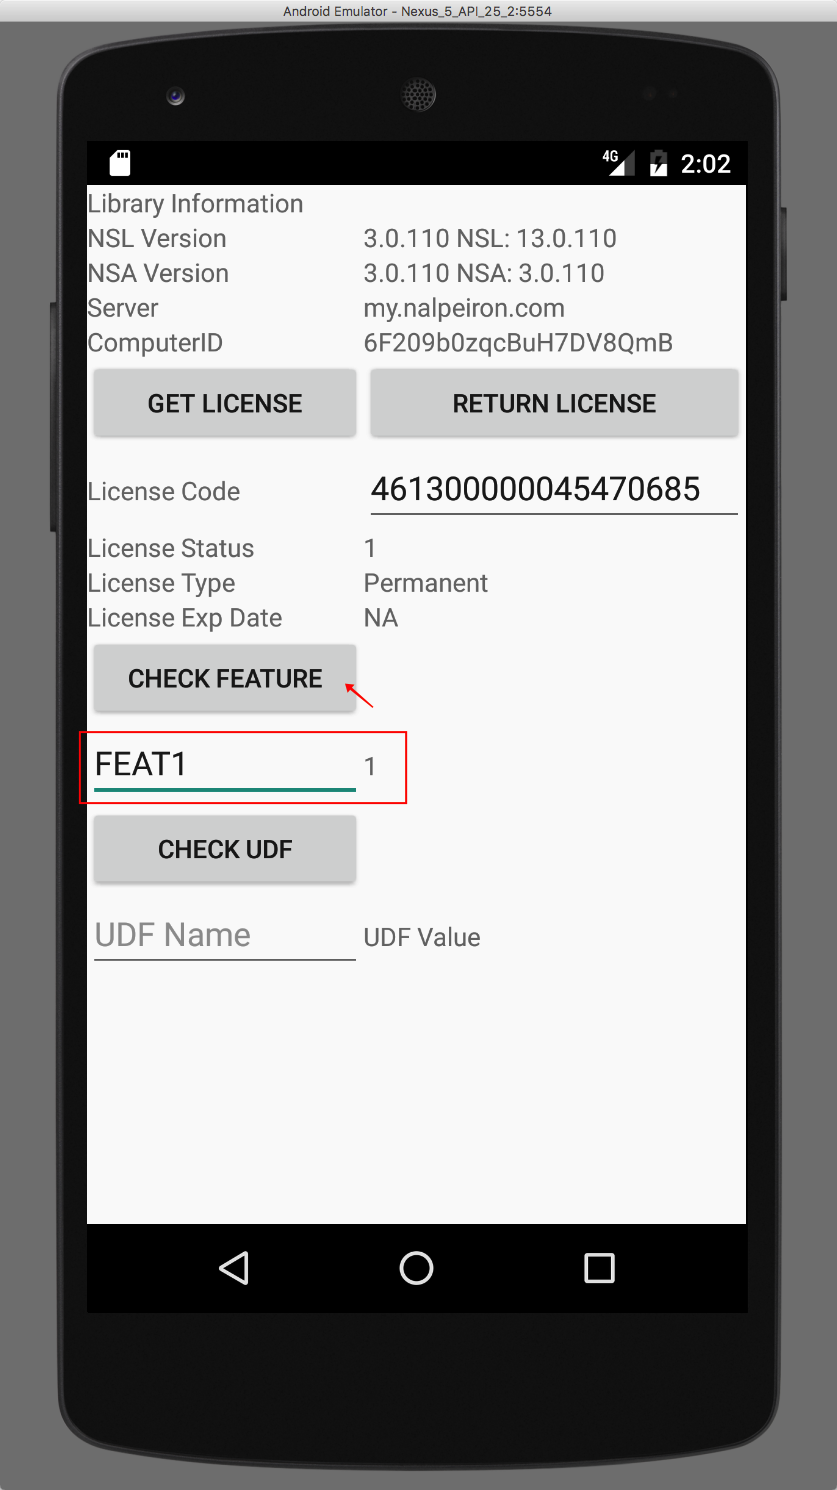
Note: You must type in the feature name exactly as it is on the server, it is case sensitive.
As we can see from the device the license status return is 1, or feature active.
1 active license
Failure mode for features
If you check for a feature and that feature has not been enabled in the server-side license i.e. it's in the local client but not on the server you will get an error when checking a feature as below.
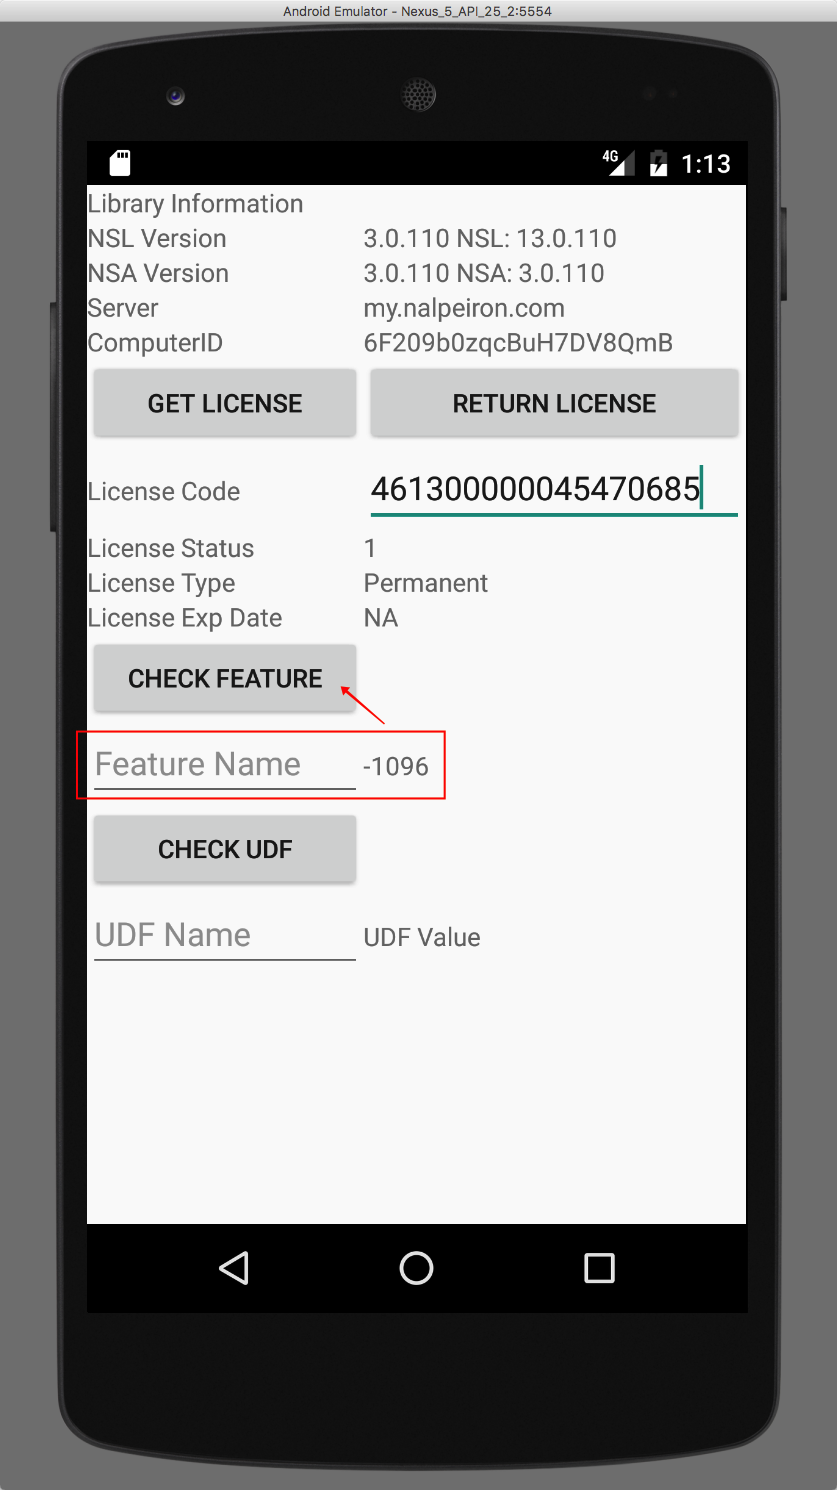
In this case, the error return -1096 means the XML tag requested isn't present in the license file.
If a feature is disabled, it is not present in the local license file so when the client looks it up, it cannot find and returns an error code for XML lookup failed.
Testing Application Agility (UDF)
Now we can test the control of your own data (UDF: User Defined Field) on a trial or activated device. We call this feature Total Application Agility (TAA).
In this test case, we have added a field called UDF1 with a value of "UDF1" to the server side so we can see that being enabled on the client.
This can be set several ways, in this case, we set it at the “product” setup level, under the "advanced options", as below.
Testing TAA/UDF Activation
In order to test control of TAAyou must first set up your “products” as above and then test a specific code to enable a set of pre-designated key value pairs.
In this case, we have already added a field called UDF1 to the server-side as above in "product" setup.
All we need to do to get started on testing is to edit a license code and edit the TAA field by adding a value.
- Find the code you wish to enable “TAA” via search or the license code list (box icon).
- At the bottom of the page is the “TAA” tab, select that and edit the field next to the UDF1 field name.
- Add the test field data UDF1, then click "save".
- Next, return to the test app on the device and run that.
- Enter the license code: 461300000045470685
- First click the “Getlicense” button to set the perpetual license
- Then click the dialog box that says "UDF name" and enter UDF1 with the device keyboard (this will then search for the field UDF1 on the server.)
- Then, click the "check UDF" button to query the server for UDF1 and return the data in the key-value pair, in this case, UDF1 again.
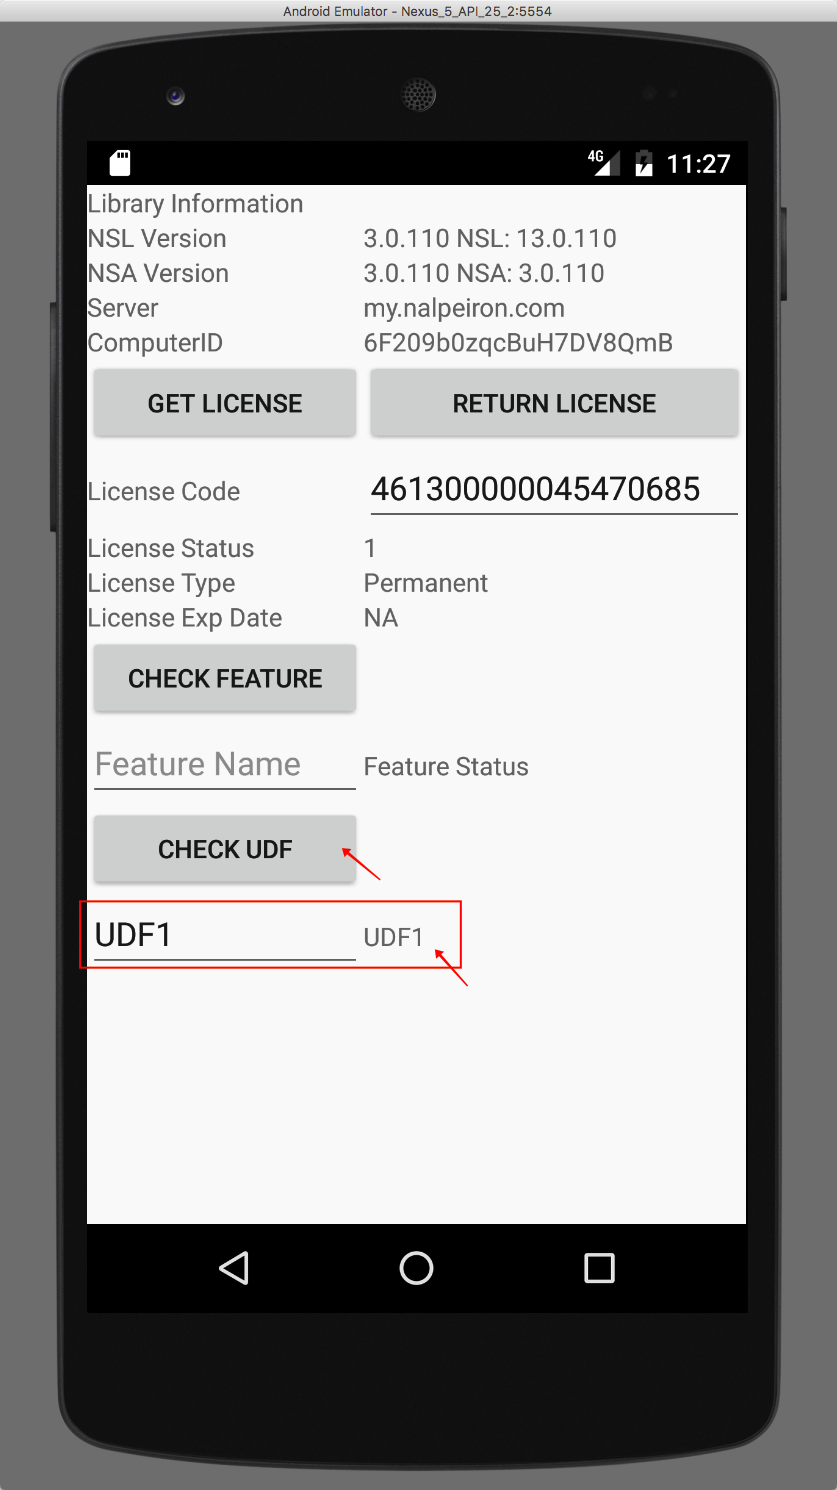
Note: You must type in the UDF name exactly as it is on the server, it is case sensitive.
As we can see from the device the correct data has been returned from the record on the server side as expected.
Now let's change the data server-side and recheck that the data is updated on the client-side.'
- In this case, we are going to change to "Testing again" as the 2nd data string on the server.
- Log back into the Publisher Center and navigate to the license code as above, and edit the TAA field data. Click "save".
- Then switch back to Android Studio and the device UI.
- Click the dialog box that says "UDF name" and enter UDF1 with the device keyboard (this will then search for the field UDF1 on the server.)
- Then, click the "check UDF" button to query the server for UDF1 and return the data in the key-value pair, in this case, UDF1 again.
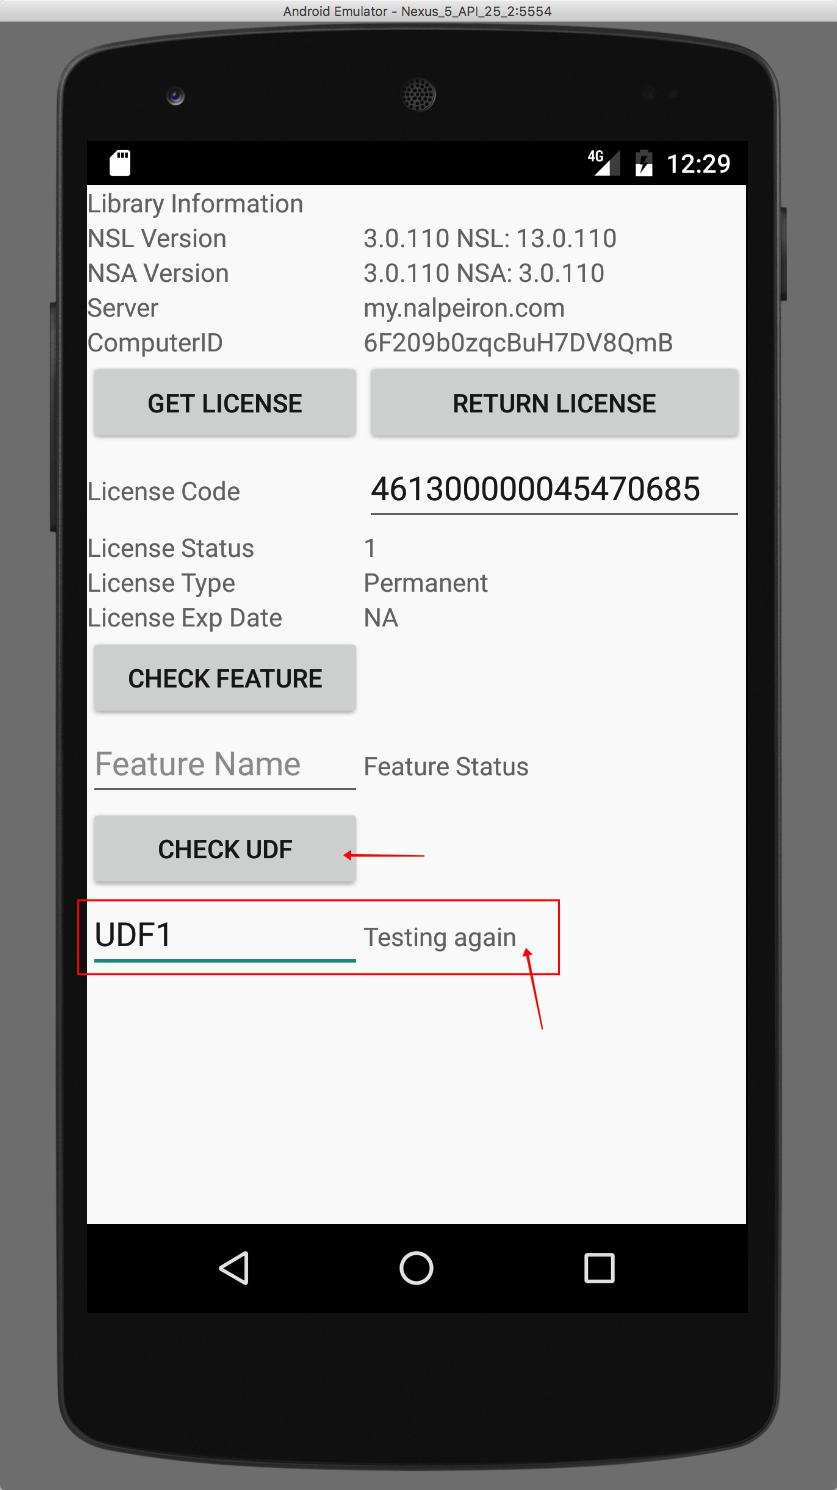
- Now you can see the returned data has changed and it shows the correct new value "Testing again" as expected.
Failure mode for UDF
If you check for a UDF field and that field has not been enabled on the server you will get an error when checking a UDF as below.
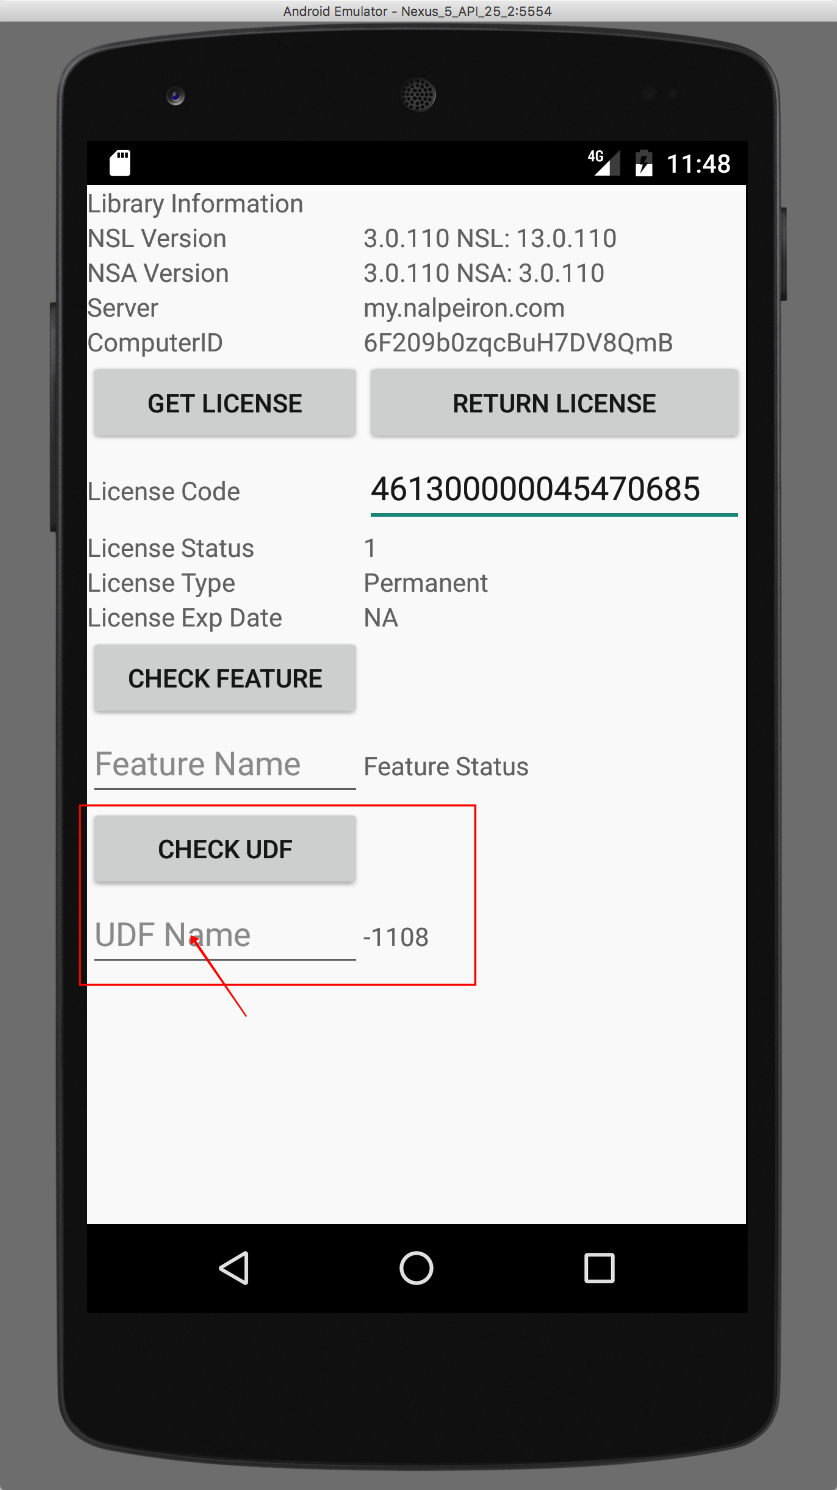
In this case, the error return -1108 means the XML tag of null, as you left it blank, was not found. Which is correct, there is no such field on the server.
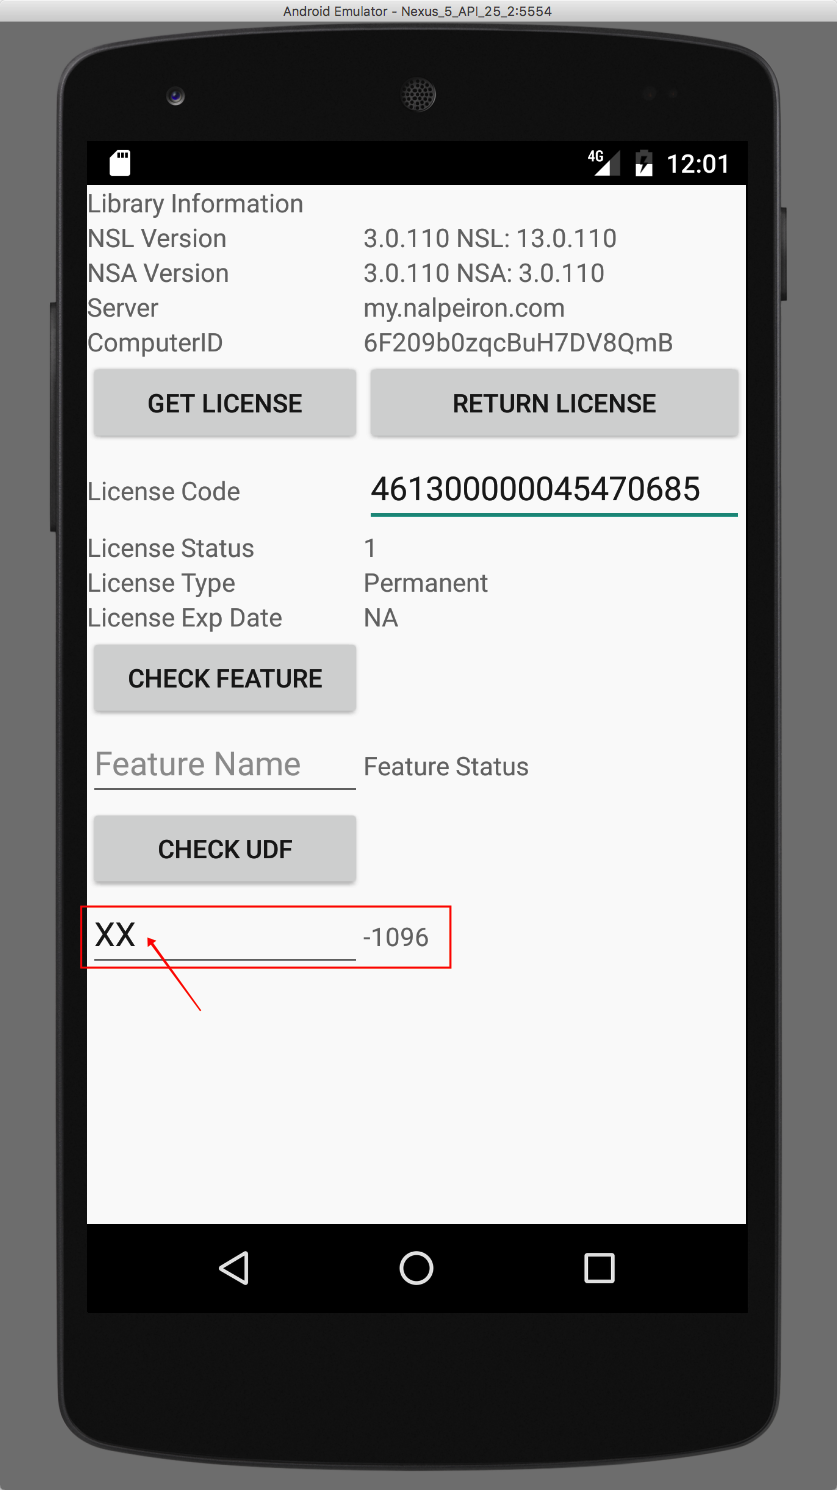
In this case, the error return -1096 means the XML tag requested isn't present on the server.
Testing the Analytics
In addition to sending the license data, we can also capture more information about the devices used in the Analytics test.
The simple test is to send extra data that you can review both in the NSL (licensing) dashboard as well as on the Analytics side (NSA).
In this case, we are looking for data associated with a device and not a license code.
- Start the testing by ensuring you have loaded the NSA version of the sample code.
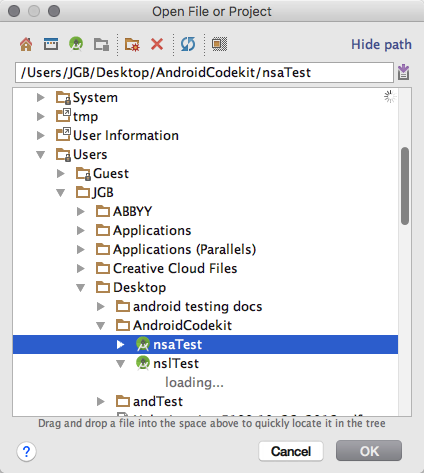
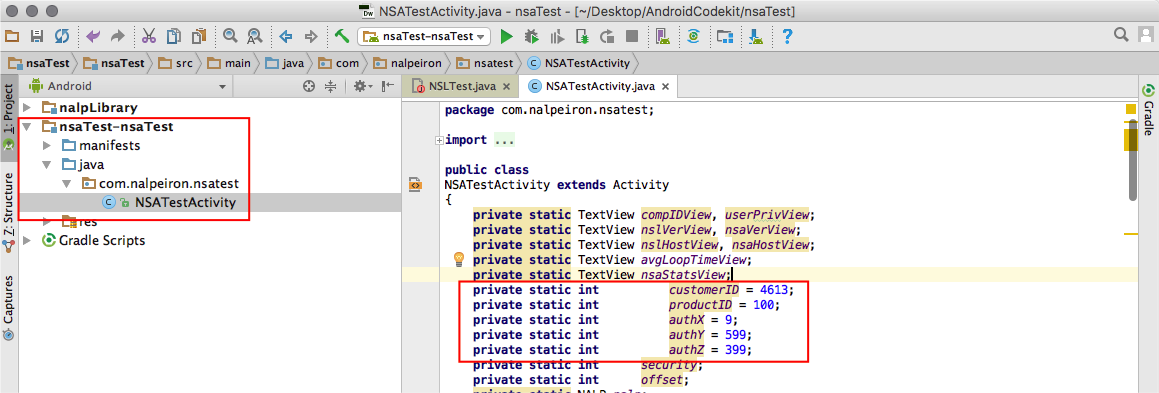
- You will need to edit the sample project exactly like you did with the NSL (licensing) sample with the correct parameters from your Publisher Portal (Customer and Product IDs and Constants). See the beginning of the article for details.
- In addition, you will need to download and install the relevant library file for Analytics.
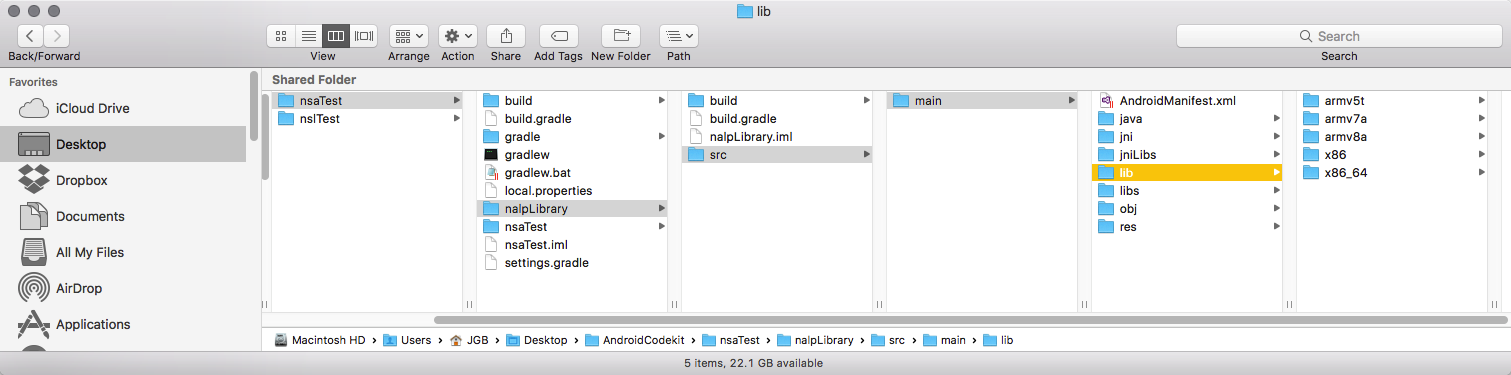
- As usual with Android Studio you may need to install extra components, please do that before continuing the testing.
- Once you're ready you can run the NSATestActivity sample code.
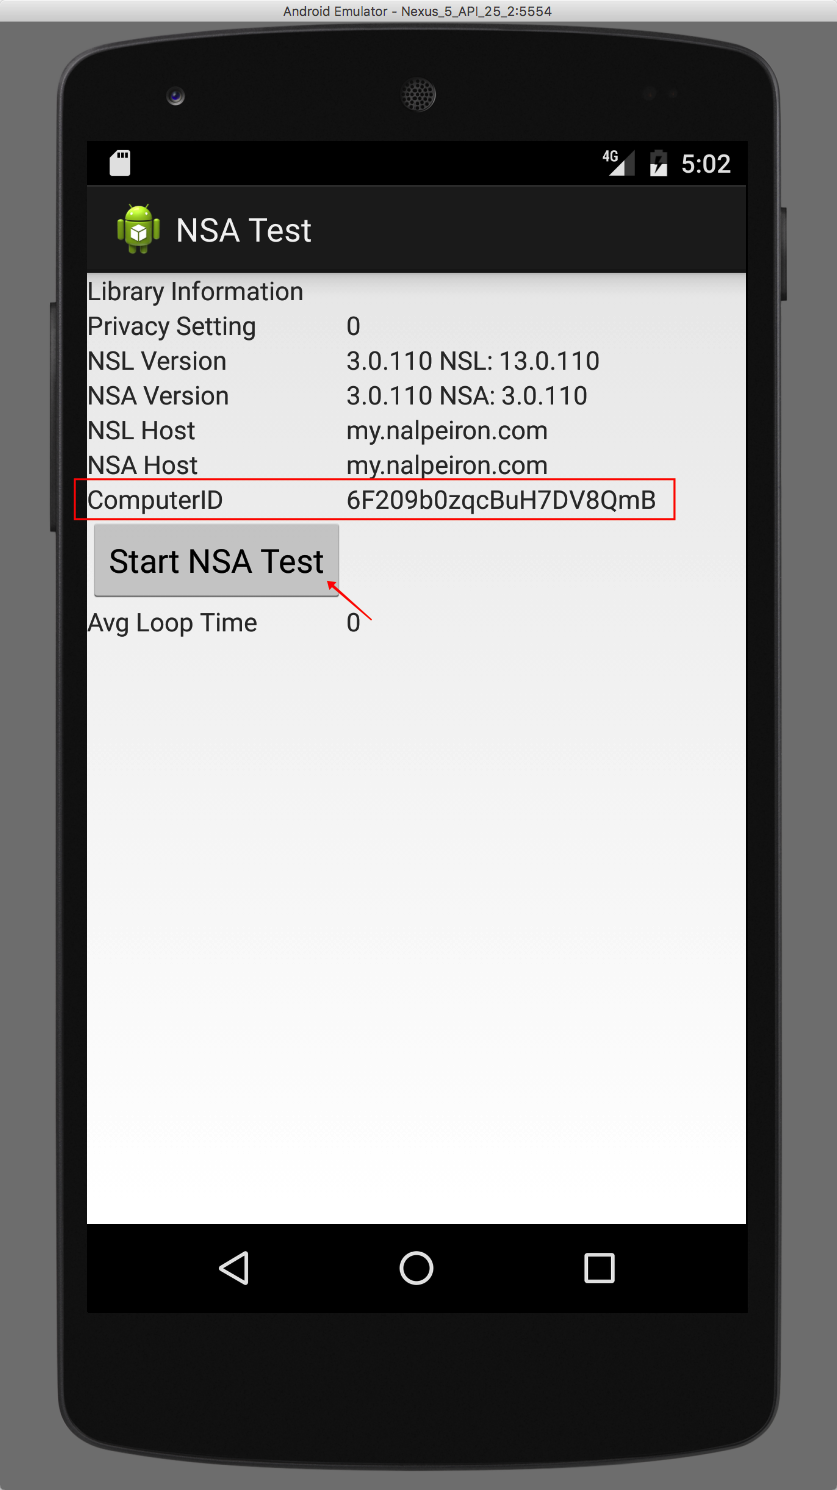
- On the NSA test screen, you can note the ComputerID again to search the server-side in the next step.
- Now click the “Start NSA Test” button
This will send data to the servers, and you will then see the XML data stream being exchanged within the app.
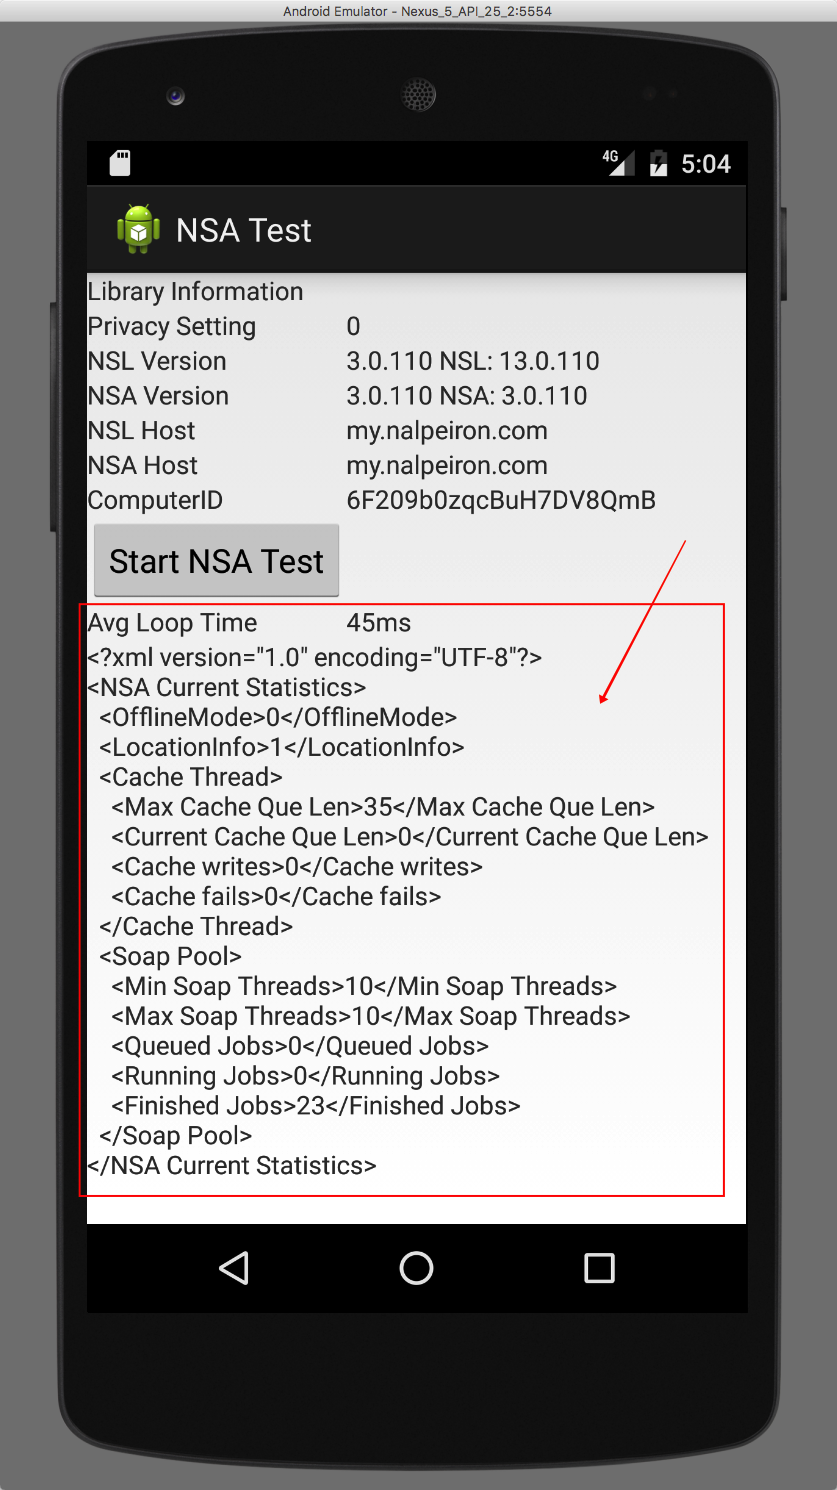
That’s all that’s required for this test; now we navigate back to the server side to see the results.
Checking the server-side Analytics data
Log in to the server portal:
Go to https://my.nalpeiron.com
Use the credentials provided to access the server side.
Now we can review the device: 6F209b0zqcBuH7DV8QmB by searching for it in the NSL dashboard.
Simply copy the device ID into the search dialog box and then click “Device Details” button.
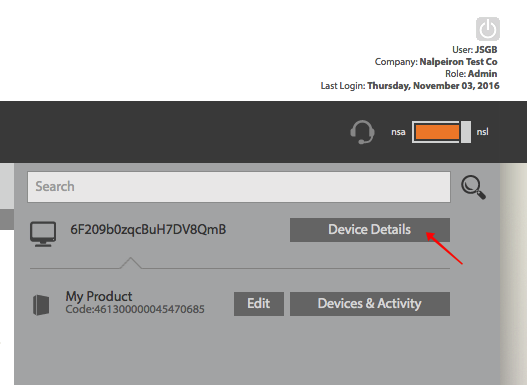
Before you run the NSA test on the device you will have no detailed analytics data associated with the server-side record, as shown here:
After running the NSA test on the device you will then see more detailed data come into the record:
This is the end of the Analytics testing for this device.
Of course, there will be more meaningful data in NSA once you have many devices sending data back to the servers, this is discussed in detail within the docs on NSA.
Licensing and Analytics can be used together in your final project.
Resetting everything to restart testing
Now you have completed a basic test, you can continue with your test plan and ensure your own application works and the business model you wish to deploy is fully understood and documented.
The way to test (again and again) on the same machine is to:
- Setup and run a test scenario.
- Delete the current test files on both the device and the server-side.
After each cycle "delete" each trial scenario you test to ensure a clean test cycle next time - otherwise it getting very hard to manage test cases and the results can be confusing as license data and files can get mixed up.
Delete Server-side Records for activations (not trials)
Remember we have "activated" a trial so we need to go to the "license management" dashboard to find the code we have used. The "license management" dashboard is highlighted below (box icon) in the product toolbar.
- Then click the "Devices & activity" for the specific test code you used to activate.
This will show a list of all devices connected to this license code.
- Then "delete" your test device record (we call that a "Computer ID").
NOTE: Make sure you're editing the correct test code and device.
- You will be prompted to confirm the deletion, click "yes" to finish cleaning out the server side record.
- Now you be able to see that the records for that license code are back to a 'clean" state and can move on to the client-side clean up process.
- You can see the screen has no devices in the list and shows 0/1 “active clients” now.
To quit and clear the data on the device (in Android)
In order to install various versions of the .apk apps you may need to stop the running app. And clear out the data. This is one way to clean down the device-side analytics and records.
- Start by clicking on the “recent/manage apps button” on your device, this will change based on the device and version of Android.
- This should show a list of installed apps.
- Click on the NSL or NSA Test app.
- Click on “clear data” button to clear out the saved license data.
- Then “force stop” to clean down the app. From memory and setting the system up for retesting.
- If you want to install a new version of the app. You can also “uninstall” the older app. and re-sideload the new .apk file.
APPENDIX
More details on how to sideload and use Android tools to test.
The first step to side loading is to ensure the device is connected via USB to the PC used to install the files and that has a version of the Android SDK installed. In order for the PC to work with the device and the Android tools, the device should be set into developer mode as below.
Settings > About Phone > Build number > Tap it 7 times to become developer;
http://developer.android.com/tools/device.html
Setting the Device into developer mode in Android
Start the device and navigate to the following screens:
Android > Settings > {} Developer options
> ON (toggle)
Switch on Developer options with the blue toggle switch at the top of the page
> DEBUGGING / USB debugging (radio)
Switch on with the radio button for USB debugging
Return to the home screen
- Set up your system to detect your device.
- If you're developing on Windows, you need to install a USB driver for adb. For an installation guide and links to OEM drivers, see the OEM USB Drivers (http://developer.android.com/tools/extras/oem-usb.html) document.
- If you're developing on Mac OS X, it just works. Skip this step.
- If you're developing on Ubuntu Linux, you need to add a udev rules file that contains a USB configuration for each type of device you want to use for development. In the rules file, each device manufacturer is identified by a unique vendor ID, as specified by the ATTR{idVendor} property. For a list of vendor IDs, see USB Vendor IDs, below. To set up device detection on Ubuntu Linux:
- Log in as root and create this file: /etc/udev/rules.d/51-android.rules.
- Use this format to add each vendor to the file:
- SUBSYSTEM=="usb", ATTR{idVendor}=="0bb4", MODE="0666", GROUP="plugdev"
- In this example, the vendor ID is for HTC. The MODE assignment specifies read/write permissions, and GROUPdefines which Unix group owns the device node.
- Note: The rule syntax may vary slightly depending on your environment. Consult the udev documentation for your system as needed. For an overview of rule syntax, see this guide to writing udev rules.
- Now execute:
- chmod a+r /etc/udev/rules.d/51-android.rules
Note: When you connect a device running Android 4.2.2 or higher to your computer, the system shows a dialog asking whether to accept an RSA key that allows debugging through this computer. This security mechanism protects user devices because it ensures that USB debugging and other adb commands cannot be executed unless you're able to unlock the device and acknowledge the dialog. This requires that you have adb version 1.0.31 (available with SDK Platform-tools r16.0.1 and higher) in order to debug on a device running Android 4.2.2 or higher.
When plugged in over USB, you can verify that your device is connected by executing adb devices from your SDK platform-tools/ directory. If connected, you'll see the device name listed as a "device."
If using Android Studio, run or debug your application as usual. You will be presented with a Device Chooser dialog that lists the available emulator(s) and connected device(s). Select the device upon which you want to install and run the application.
If using the Android Debug Bridge (adb), you can issue commands with the -d flag to target your connected device.
Using the Android SDK in Windows (or OSX)
You must download Android SDK from the below link. You don't need the
full-blown kit as you only really need adb.exe and you will also need JAVA installed.
Installing Android Studio
Android Studio provides everything you need to start developing apps for Android, including the Android Studio IDE and the Android SDK tools.
If you didn't download Android Studio, go download Android Studio now, or switch to the stand-alone SDK Tools install instructions.
Before you set up Android Studio, be sure you have installed JDK 6 or higher (the JRE alone is not sufficient)—JDK 7 is required when developing for Android 5.0 and higher. To check if you have JDK installed (and which version), open a terminal and type javac -version. If the JDK is not available or the version is lower than 6, go download JDK.
http://www.oracle.com/technetwork/java/javase/downloads/index.html
[ Show instructions for all platforms ]
Sideloading the ADK.
Now we need to connect the device to the system and install the files.
When plugged in over USB, you can verify that your device is connected by executing adb devices from your SDK platform-tools/ directory. If connected, you'll see the device name listed as a "device."
If using Android Studio, run or debug your application as usual. You will be presented with a Device Chooser dialog that lists the available emulator(s) and connected device(s). Select the device upon which you want to install and run the application.
If using the Android Debug Bridge (adb), you can issue commands with the -d flag to target your connected device.
http://developer.android.com/tools/help/adb.html
You can find the adb tool in <sdk>/platform-tools/
In Windows it’s usually located here:
C:\Program Files(x86)\Android\android-sdk\platform-tools\adb.exe
To use adb in Windows
Use CMD prompt in Windows
for using a 64-bit os try going step by step, type in command prompt:
- cd C:\Program Files (x86)
next, you will enter: C:\Program Files (x86) directory then type:
- cd Android\android-sdk\platform-tools
then enter:
- adb devices
You should then see a list of attached devices
Now you are connected to the device you need to install the .apk files to the device. (this can be done with various tools not just command lines one like adb).
NOTE: If you don't see any listed you may need to install a Google USB driver for Android.
If you are developing on Windows and would like to connect an Android-powered device to test your applications, then you need to install the appropriate USB driver as above.
To Install the APK packages to the device
Installing an Application
You can use adb to copy an application from your development computer and install it on an emulator/device instance. To do so, use the install command. With the command, you must specify the path to the .apk file that you want to install:
- adb install <path_to_apk>
In this case, we have placed the Nalpeiron files into the Win root folder for simplicity and use the following commands to install both files to the device:
- adb install c:\nslTest-release.apk
- adb install c:\nsaTest-release.apk
An alternative to this process if you are happy using other tools is the mobilego tool from wondershare: http://mobilego.wondershare.com/