
Introduction
As an alternative to standard device-based licensing, where software licenses and associated entitlements are tied to particular machines, Zentitle offers Account-Based Licensing (ABL). ABL associates licenses and entitlements with user accounts and, as such, offers the kind of flexibility required by end-users who need to access their software on multiple devices. Contact your Account Representative about having ABL turned on for your account.
ABL is implemented by Zentitle using the idea of a group, to which users and license codes can be assigned. Groups can be created and managed on the Zentitle dashboard. Here, we show you how this may be done. We describe how to create groups and associate them with your customers. You can then define and associate end-users with these groups. License codes can also be associated with these groups. These can be pre-existing license codes or codes allocated on the fly.
Groups on the Zentitle Dashboard
The Groups Page
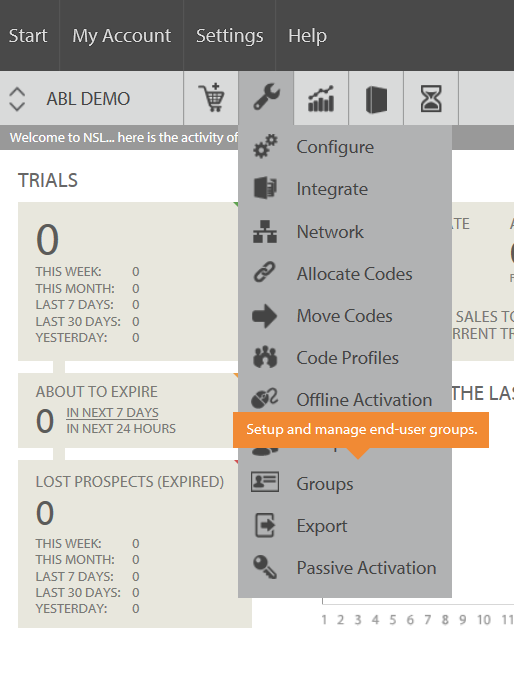
The Groups page on the Zentitle dashboard can be accessed via the wrench icon on the gray navigation bar. Clicking this and selecting Groups as shown below will take you to this page.
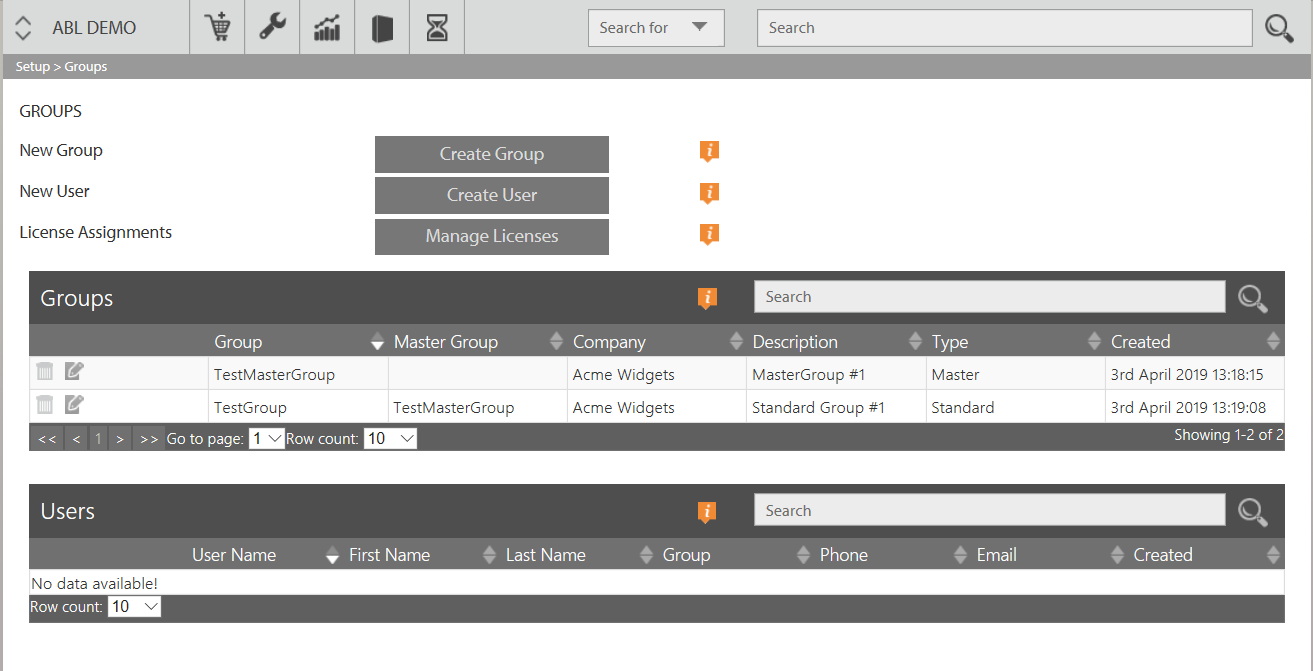
The Groups page is shown below.
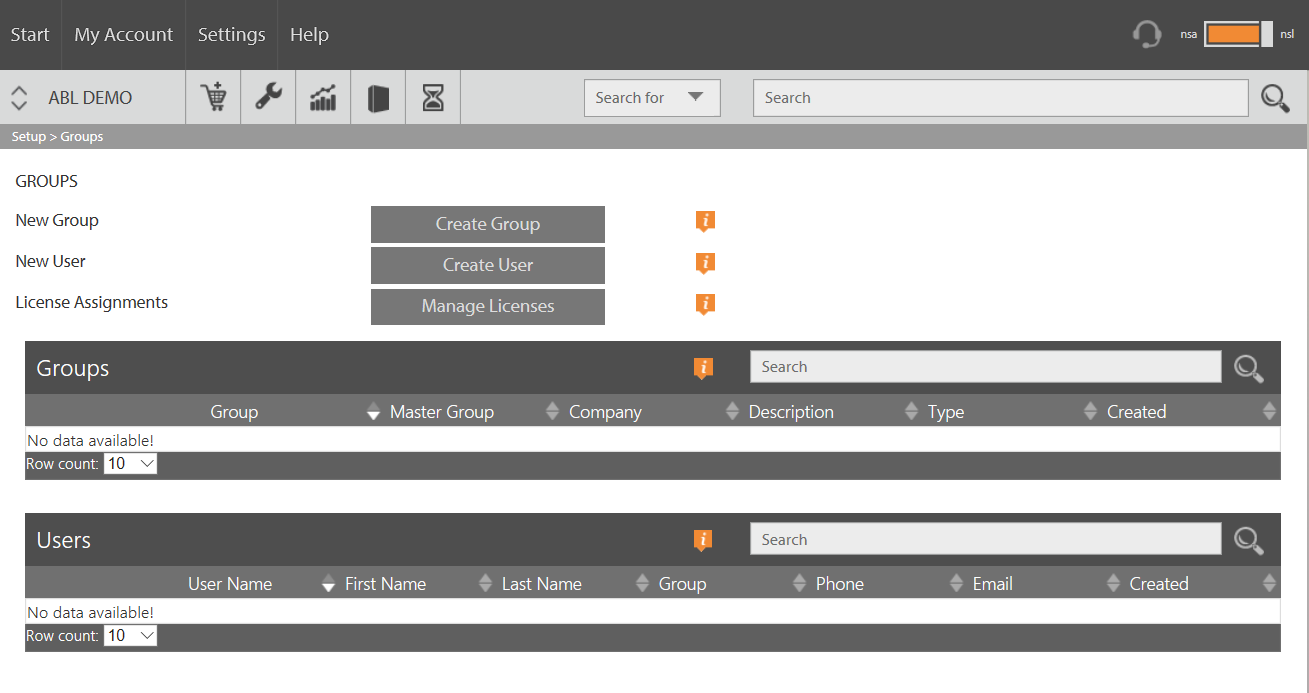
On this page you can see the following items:
- Create Group button: This creates a new group.
- Create User button: This creates and assigns to a group a new end user.
- Manage Licenses button: This opens a page for managing group license assignments.
- Groups table: This displays information about the groups you have created including license assignments.
- Group Users table: This displays information about the end users you have created.
Both tables have search boxes that you can use to search for information about groups and their associated users. On the Groups table, you can search for groups by name using a substring. On the Users table, you can search for user names, first names, last names or email addresses, again using a substring. The corresponding table will be populated with the search results.
Creating Groups
Creating a Master Group
Clicking the Create Group button will open the Create Group form on which can you create a new group. You are required to enter the group name. This cannot be that of a pre-existing group.
We recommend that the first group you create is a Master Group. As the name suggests, this is a group having a parent-child relationship with each group 'below' it. Below each master group can be standard groups or other master groups and there is no limit to the depth of this hierarchy.
To create a master group, check the 'is Master Group' box. The Master Group drop down will only show 'None' if there are no pre-existing master groups.
You may wish to provide a description of your master group. This may be entered into the 'Description' text box. You can also can associate this group with a particular company (i.e. a customer) you have defined by selecting this company from the Company List drop down. In the Company box, enter a substring of the company name of interest. The Company List drop down will then populate with companies matching this substring and you can then choose the one you require.
Groups are not product specific. As such, you can only associate one with a non-product specific (i.e. with only a global) company. For this reason, only global companies are shown in this drop down. Group names are also required to be unique.
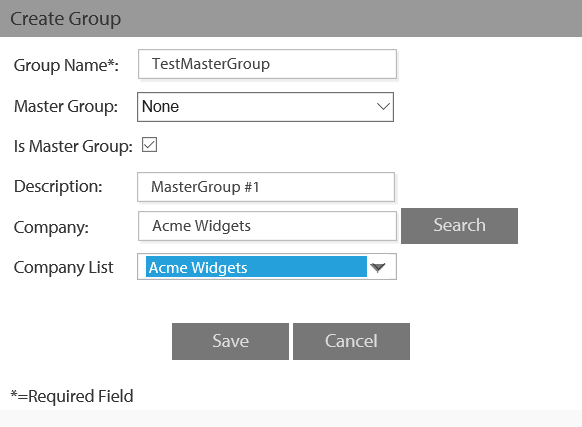
Click 'Save' to save your new Master group. You will now see the details of this group in the Groups table as shown below:
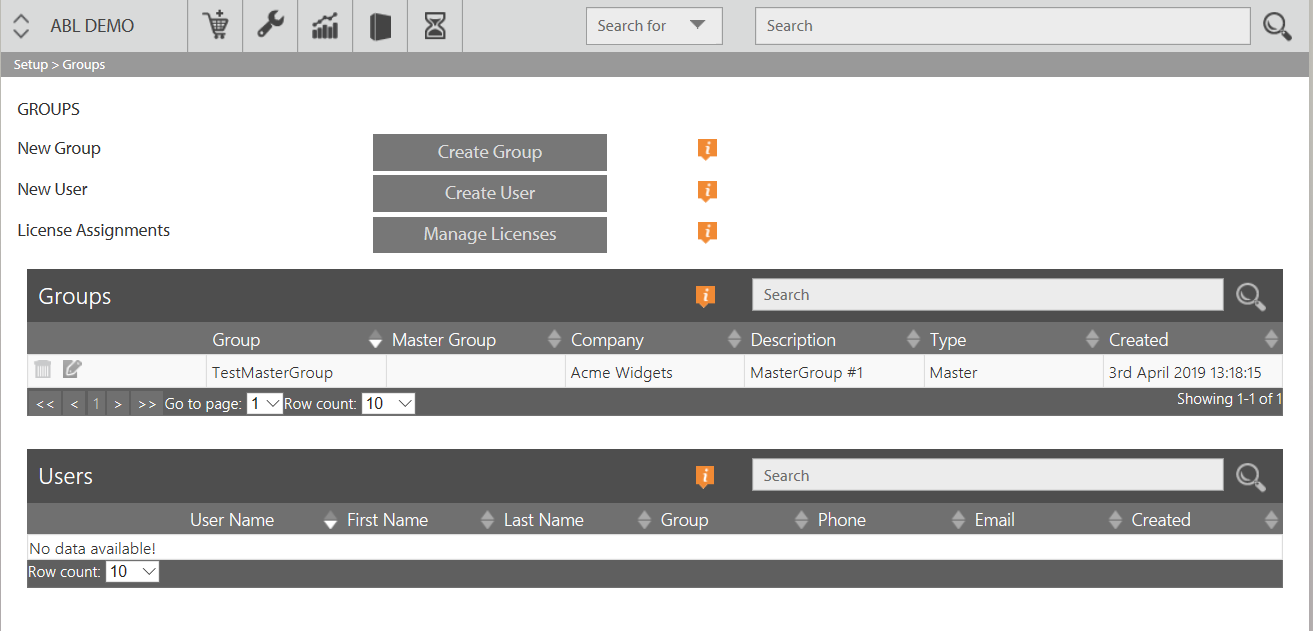
Notice that in the left most column of this new row in the Groups table are two icons: a trashcan and a pen & paper. The associated functionality here is:
- Delete Group: Clicking this button will enable you to delete the group described in this row.
- Edit Group: Clicking this button will take you back to the same form you created the group with to edit its properties.
Creating a Standard Group
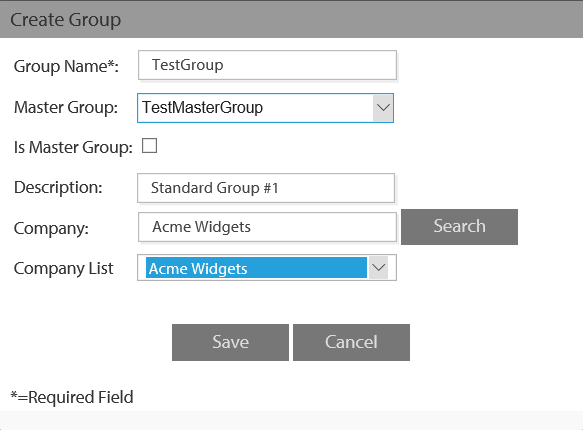
Creating a standard group is done in a similar way to how a master group is created. The only difference is that the 'Is Master Group' box should be left unchecked. You may assign this standard group to a master group by selecting one from the Master Group drop down, as shown.
Once this group has been saved, it will appear in the Groups table.
Creating Users
Clicking the Create User button will launch the Create User form:
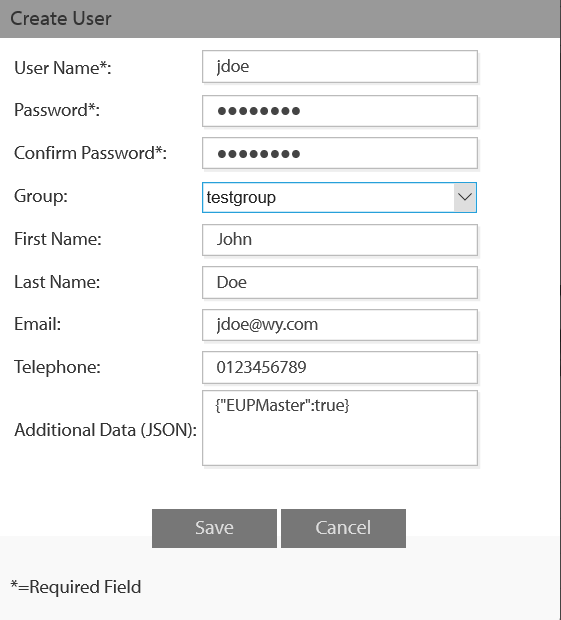
Here you can enter the details of your new user. You are required to provide a (unique) username and password. You must also assign it to a group selected from the Group drop down.
Users can be assigned to standard or master groups.
There are five other fields which are optional: first name, last name, email and telephone. The additional field accepts metadata in JSON format which can be used to enable additional functionality. At present, this field should either be left blank or contain:
{"EUPMaster": true}
Enabling this option will grant the user master privileges even if the group is not a master group.
When you save the user, the details will appear in the group users table as shown:
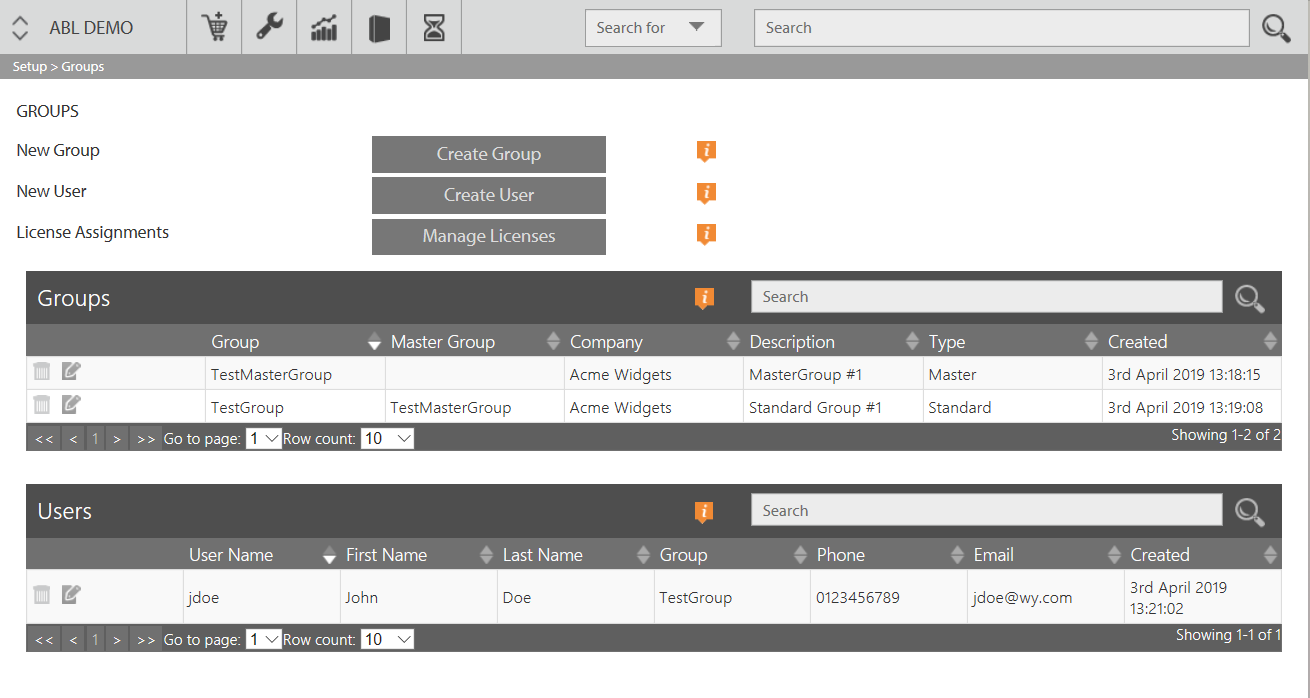
Each row in this table also has the trashcan and pen & paper icon buttons, with associated functionality:
- Delete User: This will delete the user described in this row.
- Edit User: This will take you to the same form you created the user with to edit its properties
Assigning and Managing License Codes
Clicking the Manage Licenses button will launch the Manage Group Licenses form on which you can create and manage group license code assignments. This form is shown here:
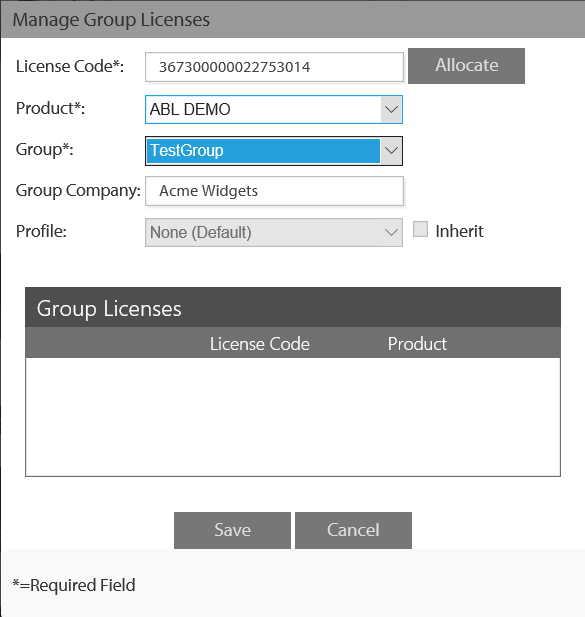
You can assign a license code to a group by either:
- Pasting an existing license code into the License Code box.
- Clicking the 'Allocate' button which will allocate a new license code for the product selected in the Product drop down.
You must select a group to which you want to assign the license code. This is done by selecting one from the Group drop down. The (read-only) Group Company box will show the company that has been chosen for the selected group.
License codes can only be assigned to standard groups. For this reason, only standard groups appear in the Group drop down.
In the case of a newly-allocated code, you can also assign this code to a license code profile by selecting the required one from the Profile drop down. You can also choose to have the license code inherit all profile properties by checking the Inherit box. You can read more about license code profiles here.
When you have saved your license code assignment, you will see it appear in the License Codes column in the Groups table, along with the name of the product to which it belongs, as shown below:
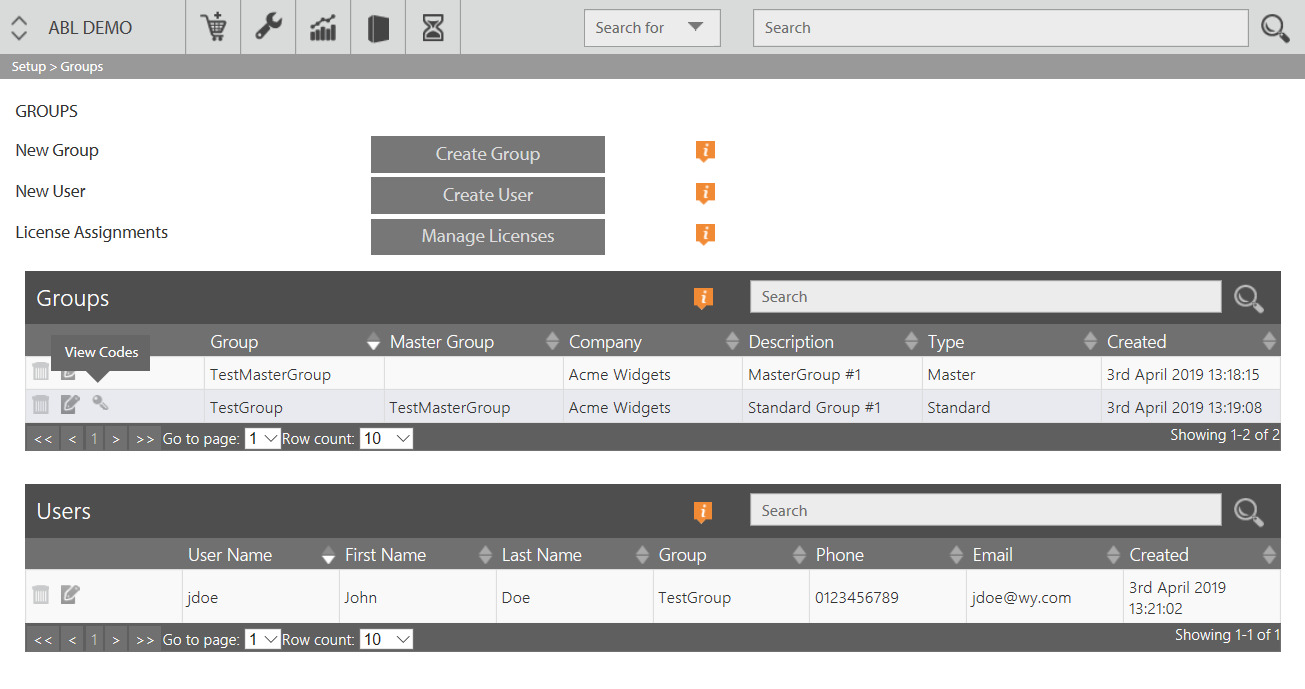
For each group to which license codes have been assigned, there is a 'key' icon in the corresponding row in the Groups table. On clicking this icon you will see a popup containing a list of the license codes that have been assigned to this group:
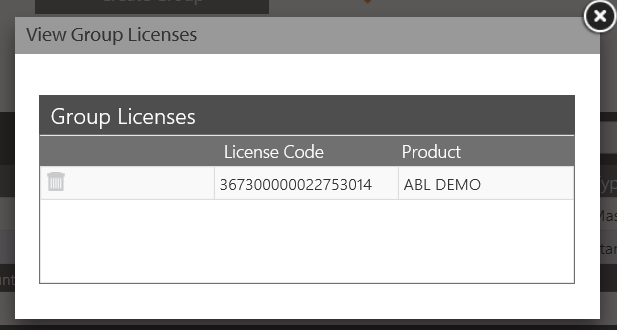
Each row in this list has a trashcan icon. Clicking this will unassign the license code from this group.
In the Manage Group Licenses form, there is also a Group Licenses table that shows all license codes and their corresponding products assigned to the group currently selected on the Group drop down. In the left-most column of this table, there is a trashcan icon in each row. Clicking this will enable you to delete this license code assignment, i.e. unassign the license code from the group. It will not delete the actual license code itself.
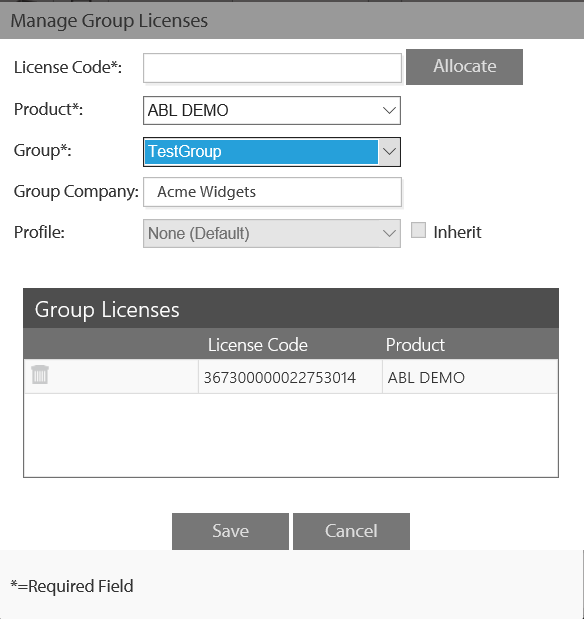
Please note the following characteristics of license code assignments:
- At most one license code from each product may be assigned to a given group at any one time. An attempt to make a second assignment will succeed but it will replace the first.
- A license code may be assigned to more than one group.
Managing Groups with Webservices
The group management functionality described on this page is also available via a suite of SOAP or REST webservices. The following webservices have been created to assist you in the integration of group management with your CRM system:
| CreateGroup | Creates a group |
| UpdateGroup | Updates a group |
| GetGroup | Gets information about the supplied group |
| DeleteGroup | Deletes a group |
| AddGroupUser | Adds a group user |
| GetGroupUser | Gets information about the supplied group user |
| UpdateGroupUser | Updates a group user |
| DeleteGroupUser | Deletes a group user |
| AddGroupLicenseCode | Assigns a license code to a group |
| DeleteGroupLicenseCode | Unassigns a license code from a group |
| GetGroupLicenseCode | Gets information about the supplied group license code |
| CreateGroupUserLicense | Creates a group, user and assigns a license |