Introduction
Most end users today have some form of Internet access and therefore the majority of your licensing will be done automatically via the web. However many of our customers also have a small group of "offline" or non-Internet connected users.
You can offer Service to your End Users, via our Self-Serve End User portal pages (that you can rebrand) or via your own support team. We will illustrate the process both ways below.
You will need to know what your two URLS are for testing below, one for activation offline and the other for deactivation. They can be found by reviewing the above article and you will need these pages open for testing when trying the self-serve portal functionality.
The Offline Activation portal is located on these user-friendly domains: http://www.startmysoftware.com (this may work better for English speakers) or http://www.activationportal.me (both will work) so please go to the Publisher Center and locate your own unique URLs off these domains by going to:
The functionality below is designed to help these users, but remember that these methods while still convenient do take longer and need more support from you.
By offline, Zentitle not only means when behind a firewall with no direct access, but also where there is a proxy server issue or some other physical barrier to a direct connection to our licensing cloud.
Contents
- Getting Started - how "offline" activation and deactivation works
- Doing an offline activation
- Server-side Activation Process - Using your own Internal Staff for support
- Server-side Activation Process - Using the customer branded "Self Serve" End User pages
- Server-side De-activation Process - Using your own Internal Staff for support
- Server-side De-activation Process - Using the customer branded "Self Serve" End User pages
- FAQs
Getting Started
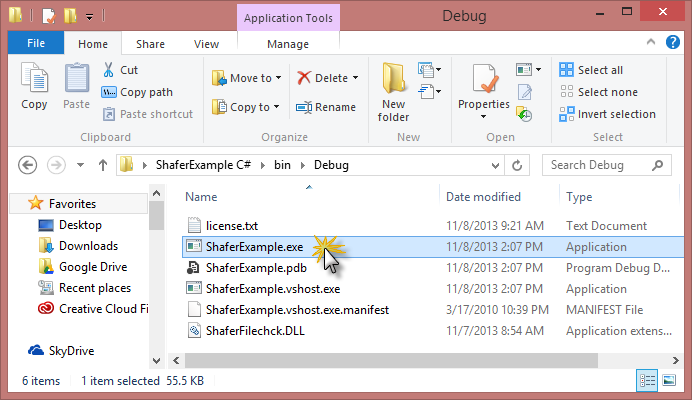
These can be downloaded from here (we are using the combined C# example below):
Application Integration
Here is the code that has been used in the sample project so you can see what we are doing:
  private void createDeactivationCertificateToolStripMenuItem_Click(object sender, EventArgs e)
{
    string Certificate = "";
    int ShaferError;

    string LicenseCode = GetLicenseCode();

    ShaferError = oShafer.GetDeactivationCert(LicenseCode, ref Certificate);
    if (ShaferError < 0)
    {
ShowError(ShaferError, false);
    }
    //Use this value to paste into Activation Server Offline Deactivation form to deactivate on server
    ShowData sd = new ShowData();
    sd.Data = Certificate;

    sd.ShowDialog();

    //Delete Saved License code To stop reactivation upon application re-run (optional, doing this step will depend on your Licensing requirements)
    SaveLicenseCode("");

    Application.Exit();
}

private void createActivationCertificateToolStripMenuItem_Click(object sender, EventArgs e)
{
    string Certificate = "";
    string regdata = "";
    int ShaferError;

    //Get registration data

    regdata += GetRegData();

    //Get the License Code, if no License code then get Offline Trial License
    string LicenseCode = GetLicenseCode();

    //Show dialog to allow end user to choose offline for Trial or Activation
    GetOfflineType got = new GetOfflineType();
    got.LicenseCode = LicenseCode;
    got.ShowDialog();

    //If cancelling then exit function
    if (got.DialogResult == DialogResult.Cancel)
    {
return;
    }

    LicenseCode = got.LicenseCode;
    //If license Code has been entered then save is for later use
    if (LicenseCode != "")
    {
SaveLicenseCode(LicenseCode);
    }


    ShaferError = oShafer.GetActivationCert(LicenseCode, ref Certificate, regdata);
    if (ShaferError < 0)
    {
ShowError(ShaferError, false);
    }
    //Use this value to paste into Activation Server Offline Activation Form to get a ImportActivation Certificate, using this value in ImportCertificate to activate client
    ShowData sd = new ShowData();
    sd.Data = Certificate;

    sd.ShowDialog();
}


private void importActivationCertificateToolStripMenuItem_Click(object sender, EventArgs e)
{
    //show the Import Certifcate form to allow user to enter Activation server generated import certificate, to activate client
    EnterImportCertificate eic = new EnterImportCertificate();
    eic.ShowDialog();

    //Get the License Code, if no License code then get Offline Trial License
    string LicenseCode = GetLicenseCode();

    ShaferError = oShafer.ImportActivationCert(LicenseCode, eic.ReturnValue);
    if (ShaferError < 0)
    {
ShowError(ShaferError, false);
    }

    //Now check all is ok
    int LicenseStatus = 0;

    //Get License Status
    ShaferError = oShafer.GetLicenseStatus(ref LicenseStatus);
    if (ShaferError < 0 && ShaferError != -1094) //No license
    {
ShowError(ShaferError, true);
    }

    //SECURITY: If computer has been BACK Dated to get more time for the trial or Subscription then Exit Application
    if (LicenseStatus == (int)Shafer.LicenseStatus.PROD_BTCOUNTER)
    {
ShowError(ShaferError, true);
    }

    //If License Status is negative then try to get license from server, if not then prompt for manual activation
    if (LicenseStatus <= 0)
    {
GetLicenseFromServer(false);
    }

    //Reactivate functions
    //Now Stop ANY further use of applications functions until Manually activated via the offline menu option
    foreach (Control c in this.Controls)
    {
c.Enabled = true;
    }
    //Enable Function Menu
    functionsToolStripMenuItem.Enabled = true;
    ShowLicenseStatus(LicenseStatus);
}

private void cancelRequestToolStripMenuItem_Click(object sender, EventArgs e)
{
    //Get the License Code, if no License code then get Offline Trial License
    string LicenseCode = GetLicenseCode();
    ShaferError = oShafer.ImportActivationCert(LicenseCode, "clear");
    if (ShaferError < 0)
    {
ShowError(ShaferError, false);
    }
}
As you can see the code is checking for Internet access and then providing the appropriate UX.
Doing an offline activation
Doing an offline activation requires both access to the client and the cloud, via a web browser.
We show two examples, one where we are assuming the end user will run the client-side process and you, the ISV, will run the server-side process i.e. the end user calls/emails/faxes you and asks for help getting their product activated as they are having Internet access issues. The second example below is where the End User self serves and this process is all on their own device, using the application and their own browser.
Let's get testing!
Generate an "activation request certificate" in your application (Client-side option)
(this is the same no matter if they self serve or send the data into the ISV)
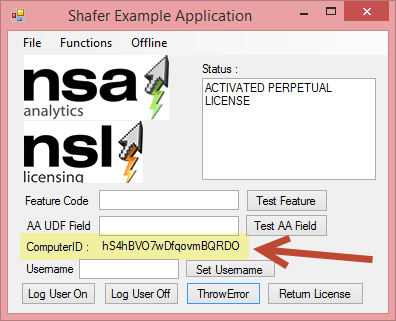
2Open the sample code project and run the test harness application.
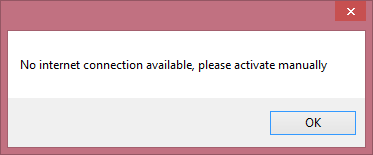
It should detect the lack of access and prompt you with a warning dialog. Then show only the “offline” option.
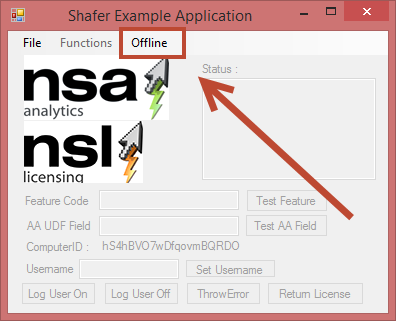
3Click on the offline option on the toolbar and then choose the “create activation certificate” option.

- This will display an option to activate either a trial or a license code.
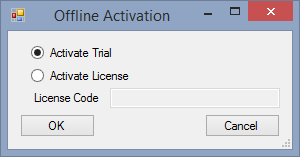
For this test we will be using a license code.
- Paste in your test code (from your allocated code list) and click OK.
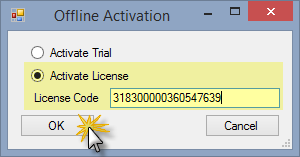
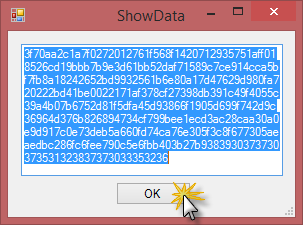
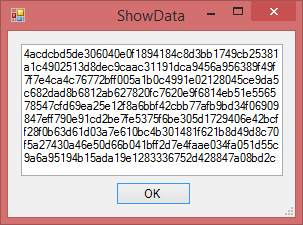
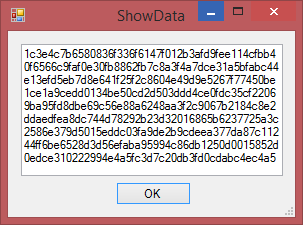
- This will produce a data dialog box where you will copy the activation certificate generated into the clipboard. Then click OK.
Or: Generate an "activation request certificate" in Zentitle (Server-side option, done by your staff)
Login to the Zentitle UI (my.nalpeiron.com) in the usual way using the credentials you got when in trial or from your admin.
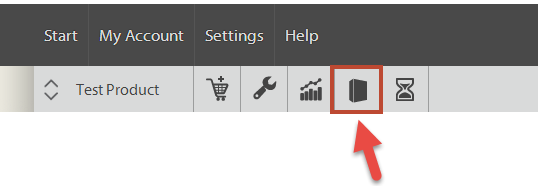
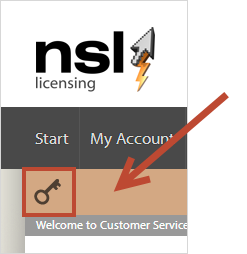
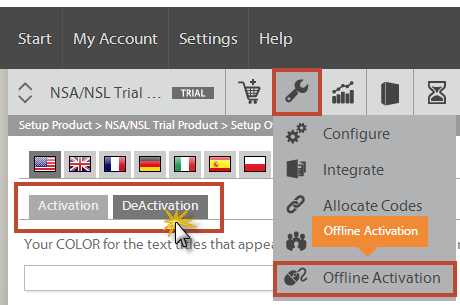
5Once in the Publisher Center, click on the “headphones” icon on the main toolbar (right) to continue the server-side process.

6Now you are in the “Customer Service Portal” and need to start the offline certificate generation process by click the “Key” icon on the sub-toolbar on the left.
7The “key” icon opens the offline license generator and this is the UI where you paste in the “activation certificate” data generated in step 3.
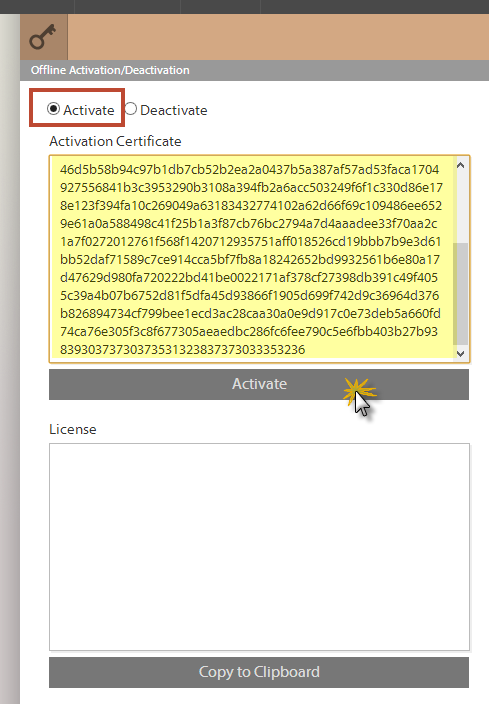
8Click the top “activate” radio button and then paste into the dialog for the “activation certificate” and click the “activate” button.
Import the "activation request certificate" (at the end user)
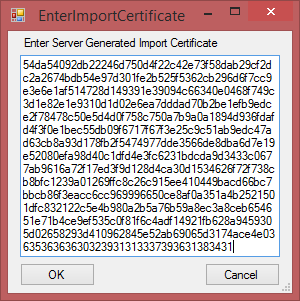
9Switch back to the client app. and the offline dialog, on the drop down this time you will click “import activation certificate.”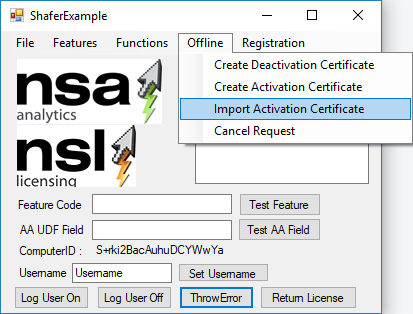
Then paste into the dialog box the license generated in step 8. Then click OK.
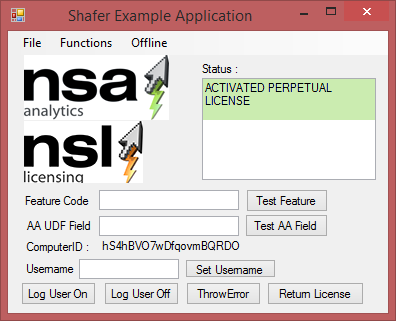
10This should complete the process and the end user node should be activated successfully.
11Checking that the process worked OK on the Server Side is also important as a final confirmation.
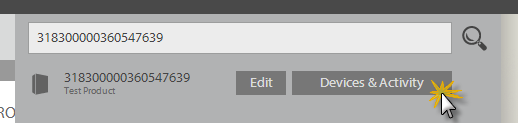
- Go to the "search" bar on the Server-side and paste in the test license code you are using.

- Once you have found the code click the "Devices & Activity" option.
- On the "Devices & Activity" page you will see the no. active clients should have increased (we are assuming you are testing with a fresh code).
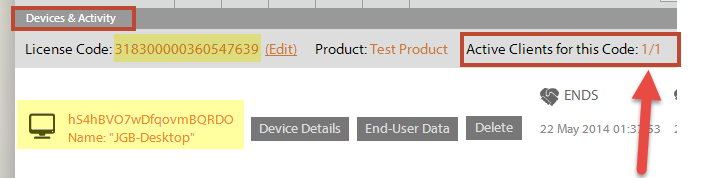
You can also review the history of the code and in this case, you will see it's in the "enabled" state and the test PC ComputerID should be registered against the code.
Now let's try that process again with the user and not internal staff processing the offline activation
Using the Offline Activation Portal (for end users to self-serve)
In this example, we will run back through the process again but this time using your own branded Offline Activation portal pages, where we are testing as if the End User is doing a self-serve process.
For this example we are going to be using two URLs, one for "activation": www.activationportal.me/self-service/activation.aspx?Type=1&cid=5568&pid=3462&lang=en-US and one for "deactivation": www.activationportal.me/self-service/deactivation.aspx?Type=2&cid=5568&pid=3462&lang=en-US. Note the pages are different, and they incorporate special addressing that is unique to you as well as a language ID. So with 10 languages supported to could have 20 page variations if required based on your needs.
Generate an "activation request certificate" in your application (client-side process)
(this is the same for both self serve or sending the data into the ISV)
1Prevent Internet access to your test PC by disabling your network adapter or wi-fi access, simulating being behind a firewall or proxy server etc.2Open the sample code project and run the test harness application.
It should detect the lack of access and prompt you with a warning dialog. Then show only the “offline” option.
3Click on the offline option on the toolbar and then choose the “create activation certificate” option.
- This will display an option to activate either a trial or a license code.
- Choose activate a license, then paste in your test code (from your allocated code list) and click OK.
- This will produce a data dialog box where you will copy the activation certificate generated into the clipboard. Then click OK.
End user uses your unique Offline Activation Portal page (server-side process)
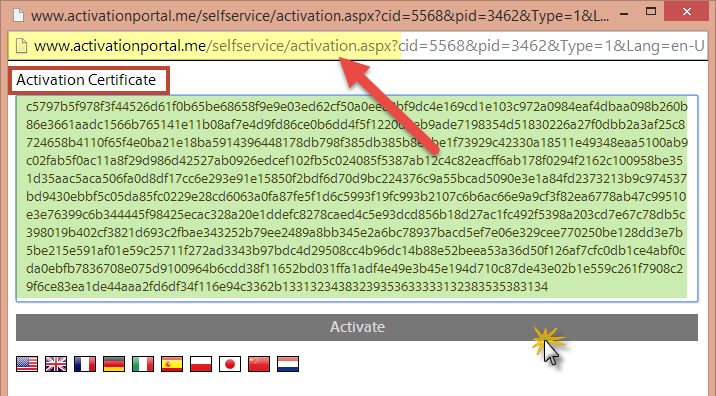
4The end user navigates to your own portal page (you can brand this how you wish).(e.g. www.activationportal.me/self-service/activation.aspx?Type=1&cid=5568&pid=3462&lang=en-US) in this example an English page, but could be one of 10 languages you can customize.
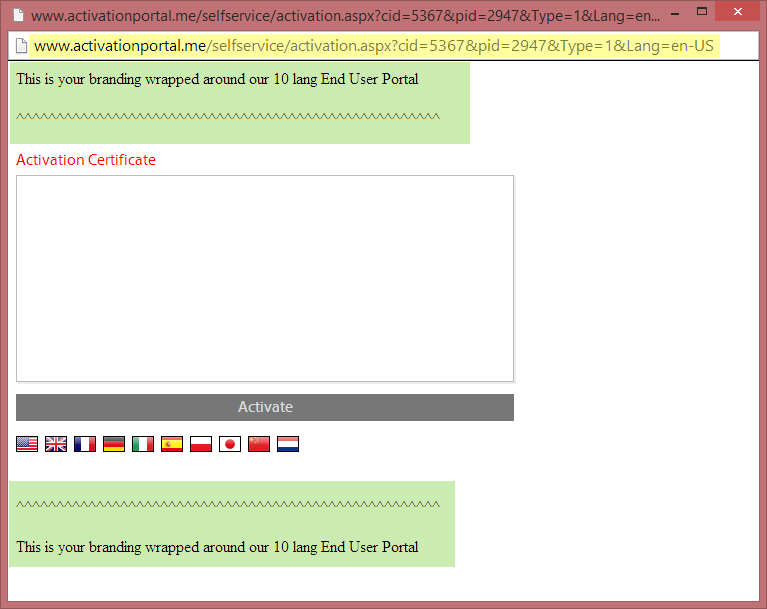
5On this page you would offer instructions on what the user needed to do to generate their activation certificate.
This is the page where you paste in the “activation certificate” data generated in step 3.
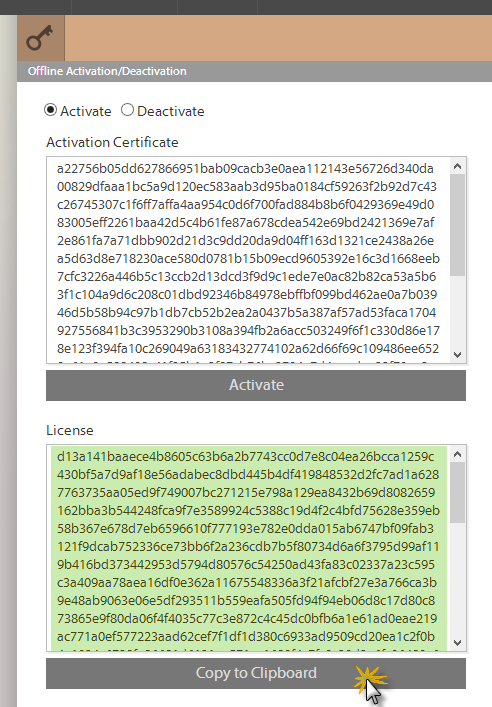
- Simply paste into the dialog for the “activation certificate” and click the “activate” button.
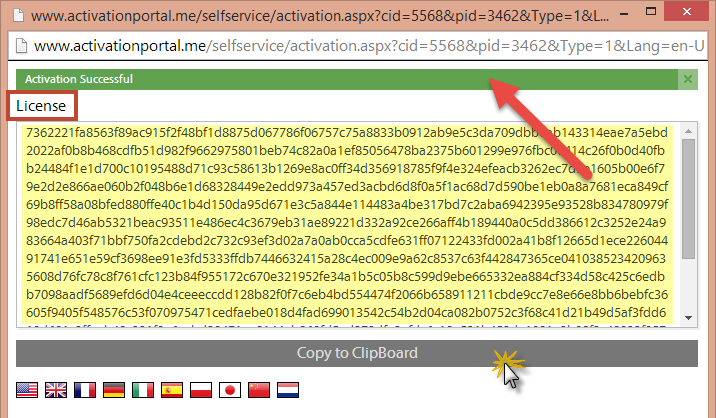
6This will generate a license and show a "successful" alert if the data is all correct between client and server.
- Click the copy to clipboard button (to get the data ready for pasting back into the client) and return to the client-side process.
Import the "activation request certificate" (at the end user)
7Switch back to the client app. and the offline dialog, on the drop down this time you will click “import activation certificate.”
- Then paste into the dialog box the license generated in step 6.
- Then click OK.
8This should complete the process and the end user node should be activated successfully.
9Checking that the process worked OK on the Server Side is also important as a final confirmation per the previous example.
Doing an offline DEactivation
Once the user has an activated license they can also do an offline deactivation (or "decrease" the license activation count from the server) so they can move a license between devices etc. This is often called "checking-out a seat" or license.
Generating a "deactivation request certificate" (client-side option)
1Disable the Internet access to your test PC by disabling your network adapter or wi-fi access.2Open the sample code project and run the test harness application. It should detect the lack of access and prompt you with a warning dialog. Then show only the “offline” option.
3Click on the offline option on the toolbar and then choose the “create deactivation certificate” option.
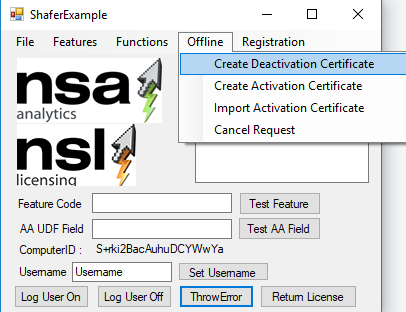
- Copy this alphanumeric certificate into the clipboard.
At this stage, the end user would be emailing you the details so your Support Representative can use Zentitle to generate the return certificate for importing back into the UI to complete the process.
Using Zentitle to deactivate (server-side option, done by your staff)
Re-enable Internet access. Login to the Zentitle UI (my.nalpeiron.com) in the usual way using the credentials you got when in trial or from your admin.5Once in the Publisher Center, click on the “headphones” icon on the main toolbar (right) to continue the server-side process.
6Now you are in the “Customer Service Portal” and need to start the offline certificate generation process by click the “Key” icon on the sub-toolbar on the left.
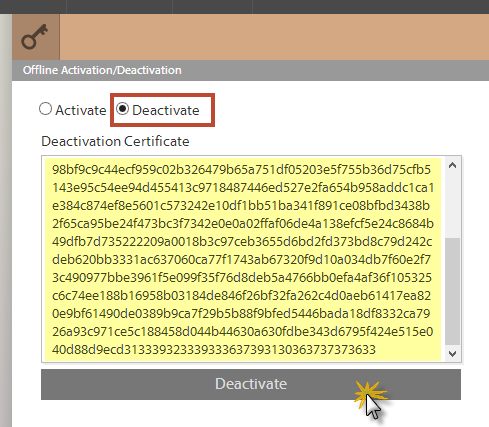
7The “key” icon opens the offline license generator and this is the UI where you paste in the “deactivation certificate” generated in step 3.
- Click the “deactivate” radio button and then paste into the dialog for the “deactivation certificate” and click the “deactivate” button.
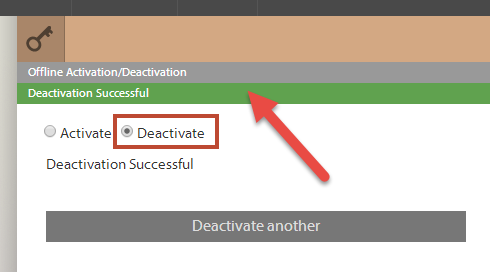
8This should complete the process and the end user node should be deactivated successfully.
9Checking that the process worked OK on the Server Side is also important as a final confirmation.
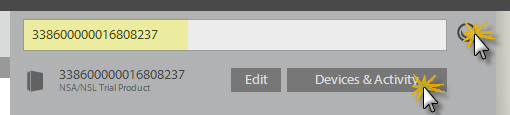
- Just search for the license code, click the "devices & activity" button
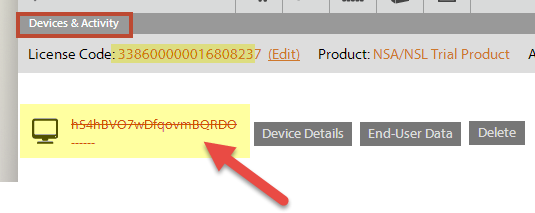
- Then check that the device you are testing has been marked as deactivated i.e. has a line struck through the device ID as seen here.
The above process of deleting the license code locally has the effect of removing the license on that PC.
You may choose not code your app. this way but that's the way we did it to ensure we can show the license being removed.

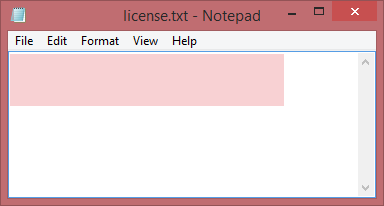
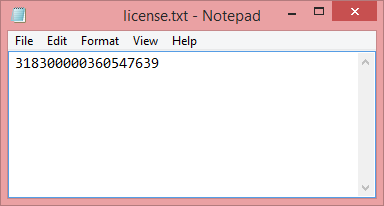
To simply remove this condition just copy the test license code back into the License.txt file and then you should be fine for further testing or you can also delete the ComputerID from the server side.
Using the self-serve portal to deactivate (server-side option, done by end user)
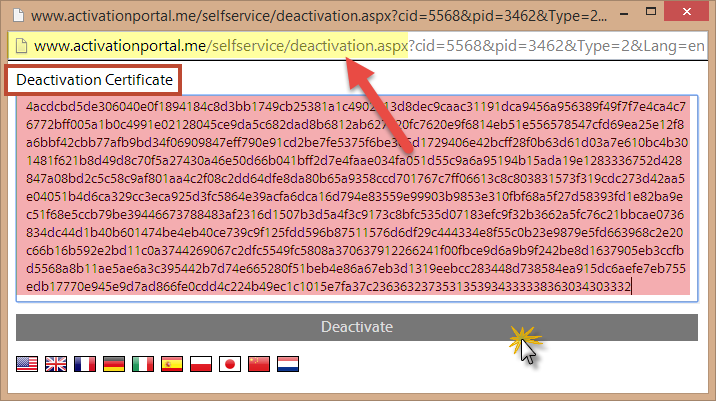
Navigate to the Deactivation URL, this is different to the Activation one (e.g. www.activationportal.me/self-service/deactivation.aspx?Type=2&cid=5568&pid=3462&lang=en-US)5Once on the correct URL, paste in the “deactivation certificate” generated in step 3. Click the “Deactivate” button.
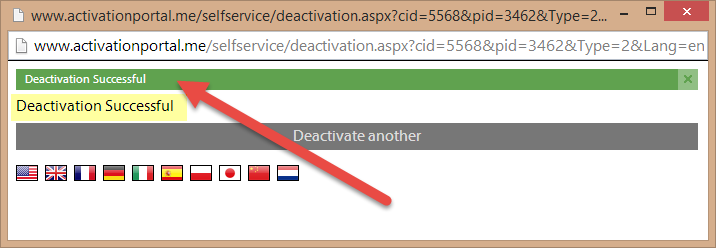
6Now you should receive an alert "Deactivation successful" accepting the certificate and that's all there is to removing that license on the server side for the user. There is no need to paste anything back into the client.
7Checking that the process worked OK on the Server Side is also important as a final confirmation.
Just search for the license code, click the "devices & activity" button
Then check that the device you are testing has been marked as deactivated i.e. has a line struck through the device ID as seen here.
Activation Request Cancellation -Client-side
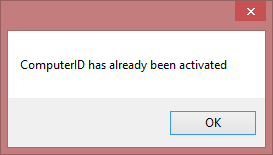
When a request for an activation certificate is made the library creates a "receipt" of that request. When the activation certificate is installed on the local system if is verified against that receipt for security purposes. Unfortunately, the activation certificate might arrive hours, or days, or months or ... after the request was initiated. If, during this delay, a second request for an activation certificate is made the local receipt will change. If the originally requested activation certificate is presented to the system it will fail as the system now has the receipt for the second request. Disallowing a second certificate request until the first is complete is the easiest way of preventing confusion.
That said, one way of allowing a second certificate request is to stop the library and clear out the WorkDir. However, you can also pass an invalid certificate (NULL pointer, for instance) into NSLImportCertificate. The system will reject the certificate, of course, and NSLImportCert will issue an error message that the certificate was invalid. It will also clear out the existing receipt information and allow a new certificate request to be made. In the newest versions ( > 3.2.50) of the library you can pass the string "clear" into NSLImportCertificate in place of the certificate container. This will clear out the local seat without returning an error value.
FAQs by developers
Q: Is the function NSLImportCertificate something I can use for offline activation? Currently, I'm using function InstallLicense() in version 7 for this purpose. Just want to confirm that for offline activation in version 10+, the function requires both a license code and a certificate code?
A: Yes, please see the example application as this shows how this works. See: Application Integration
Q: Is function NSLGetInstallationID() something I can use to get the installation ID on customer machine? The prototype exists in the header file NalpeironNSL.h but it is not in the dll.
A: Use NSLGetActivationCertReq, to create the client cert which is then used on the server to generate the act cert, which is then passed into NSLImportCertificate to activate the client in offline mode the function requires both a license code AND a certificate code? Yes Correct, if LC = null then you are offline activating a Trial, if not null it will attempt to activate a License Code offline
Q: Is there a more detail documentation on all the API functions?
A: See the API docs: Developers API (Latest). Also you can download and look at our example applications for how to use these functions in a real world application: Application Integration
Q: After a license certificate is obtained from NSLGetActivationCertReq, what would be involved to be "to generate the activation cert"? Does the end user send us the code and we generate a license certificate through Zentitle UI?
A: Yes, you can use our Customer Centre, clicking on the Headset icon on the right (next to the NSA/NSL switch) then clicking on the key icon. See the details above in this doc for the process of activating an offline certificate.
Or let the user self serve:
Use the Self Serve End User page. See details above under the section "Activation Process - Using the Self Serve End User page" that can be configured using the wrench icon then Configure Offline. This will allow your users to do this process themselves, so you don’t need a support person to create and return the unlock certificate. Also See: Rebranding the Offline Activation portal pages
Or use a web service call:
You can use our Web services API to create your own processes or include the API calls in your existing website to allow users to do this themselves without any support interaction as above.
Q: In the case of offline users how do we check in our code for trials and activations in this mode vs an online check?
A: Again see our example code and look at this function: private int GetLicenseFromServer()
Q: For users who do not have an Internet connection will need to go through the manual process to activate software into trial mode, correct?
A: Yes, you would follow this process:
- They will need to get a license certificate generated from the NSLGetActivationCertReq(NULL) call.
- They will get the 2nd "activation" certificate either from us or directly from the self-serve Offline Activation portal web site.
- The new activation certificate is entered into your software UI and used with the callNSLImportCertificate(NULL, &licenseStatus, cert) to activate for trial mode.