Introduction
There are several ways to "activate" an end user license, the first is automated and the user has access directly to the Internet, the second is where the user doesn't have direct access to the Internet due to a firewall or other connectivity issue.
In the latter case, you can direct your users to a set of localized pages where they can self-serve their licensing via a web browser. This experience can be branded to your own look and feel too.
We call this process "Offline" Activation via a portal and this is located on these user friendly domains:
- http://www.startmysoftware.com (this may work better for English speakers) or
- http://www.activationportal.me (both will work)
You can download here an example which demonstrates this rebranding.
More about how the process of "offline licensing" can be found in the Publisher Center.
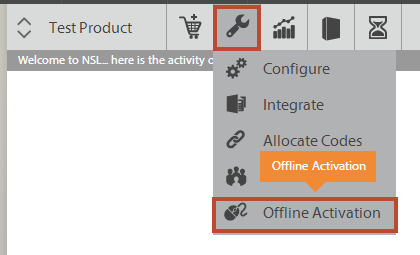
Re-branding the Offline Activation Portal
The Zentitle Offline Activation pages provide you with a set of unique web address which your end-users can visit to activate (or deactivate) their Software when they can't access the Internet directly. Offline Activation Pages are configurable separately for each product (product ID) you are licensing via NLS so you can even have differing web designs per product you sell to match that branding or channel.You can customize these pages so that they appear as you want them to, including your branding, terms and conditions, support contact information etc. You can also ‘shell’ your Deactivation Page separately to your Activation Page, and publish it separately.
The method for customization is simple, you provide the HTML of how you wish the page to look, linking to images and associated files which you host yourself, you are free to organize these as you wish.
Web designers please note that the doctype output is always html5 <!DOCTYPE HTML> and your HTML will be output within the Body tags of the page’s code. It is also worth noting that we do not output any css for anything like the <body> tags, the <h> tags etc, so you are free to control these yourself either inline or by linking to external files, free from interference.
Getting Started with editing the Portal pages
To get started please ensure you have the credentials to hand you got sent with your trial or account purchase and proceed as below.
1Login to my.nalpeiron.com
3Edit and test your custom HTML.
When you arrive on the Setup Offline Activation & Deactivation page you will see a number of tabs, one for each localization we currently support (small flags as tabs) at the top and then nested within each tab are two further tab choices: Activation and Deactivation tabs.
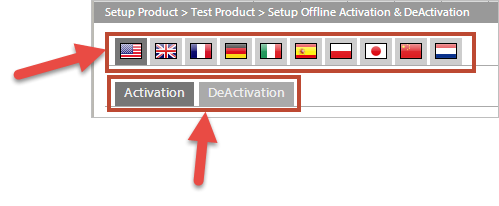
So for each language you can create a custom Activation and Deactivation page and branding.
When re-branding you are in effect wrapping your own custom HTML around our core components, these can be changed in quick and easy ways as below.
How it works
The Activation dialog Boxes have various "Titles" above them such as ‘Activation Certificate’ and you can input the Color you wish these titles to appear as a hex code including the # (for example #FFCCOO) or simply by Color name (for example ‘red’).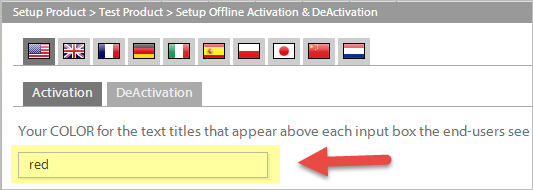
This allows you to choose different color or image backgrounds and still have our "titles" be legible.
The dialog Boxes and Buttons will fill the width of any containing element you place the include in. The containing element (such as a Div or <TD>) could have a width of a set amount of Pixels, or a Percentage.
The Boxes and Buttons have a minimum width of 400px wide.
Localization of the pages
A variety of Languages are already included (10 as of this doc), your End-Users can click on the Country Flags provided by the Include and switch languages.
Each "Country Tab" can be edited as required for each Language, and also you can separate both Activation and Deactivation pages. The core text for use within our own dialog box is already translated for you, you simply need your own web designs for your own regional requirements.
You also have the ability to put in different ‘shells’ for each language. Thus, the surrounding page you can translate what you show yourself, as well as having complete control of a completely different ‘look and layout’ from Country to Country.
US English is the ‘Default’ shell, so any page visited (via URL or by end-user clicking on a flag) that you have not specifically edited the wrapping HTML for will show the correctly auto-translated boxes and buttons but within the US English shell.
You can publish the specific URL for any Language of the Activation or Deactivation Page.
So, as a final example, it is easy to set up a German Activation Page and a German Deactivation Page which look like your German website, and a completely separate US English Activation Page and Deactivation Page which look like your US English .com website. End-Users are only a ‘flag click away’ from seeing it in a different language, and all these variety of URLs can individually be ‘published or re-directed to from a chosen URL’ using a standard methods of redirection used in web design and domain hosting so that you can present the URL to your End-Users as you wish it to be seen.
4Embedding your own code into the design
We output the necessary Dialog Boxes and Buttons into your page, all you have to do is put the include <div runat="server" id="include" name="include"></div> at the point in your code where you want these Boxes and Buttons to appear.
So if you have a page template of your own code then you can organize that so that you drop in our simple code snippet, then paste the whole lot into the dialog box we provide "Your HTML for this product's Activation page". One of these for each Activation and Deactivation look and feel you want.
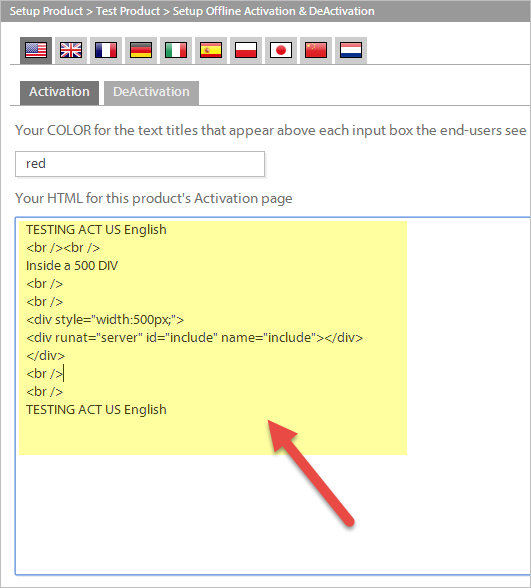
You will note some simple code in the dialog above as an example, you will need to enter something more complete and matching your own branding and current web designs when pasting in your own HTML. Repeat this process for every language you wish to edit by clicking on the flag icons at the top of the page.
5Working with your own CNAME record
Once you have input your own code with our fixed components, you will be able to see the URL you can direct end users too. This URL can be forwarded too directly from your own domain using a CNAME record. We output the full and unique URL for you in the dialog "URL for End-User Activation".

Your unique part of the URL looks like this: "?Type=1&cid=5367&pid=2947&lang=en-US" with the lang ID at the end of the string. In this way you can easily link up to various languages as required from your own support resources or pages.
6Testing and Publishing updated pages
Click each Language tab, and then each Activation/Deactivation tab.
Once you are happy about the look and feel of the pages and that they are ready for testing, click the "Save & Publish" button at the base of the page.

The saved edits will be confirmed at the top of the edit page.

You need to save any edits or changes before you preview the pages below otherwise you will not see your own code in the resulting output.
To test your page designs click the button at the bottom right "Visit URL to test" to test each Language variation you wish to use - so that's 2 pages per Language tab.

Clicking this button will open another browser Window, and this is where you can review the final page design and check it's looking as you require before saving.
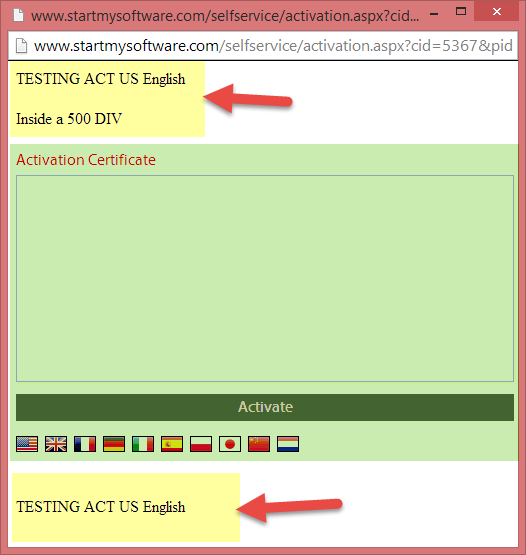
As you can see from the example above, your own code is in yellow and the standard components in green. In this case the "title" has been changed to red.
Now you should test each language by clicking on a Country flag and repeating the process.